
Globus is a simple, reliable, and fast way to access and move your research data between systems.
Globus allows you to transfer data to and from systems such as:
- Laptops & personal workstations
- Rivanna/Afton HPC clusters
- High-Security Research Standard Storage
- Lab / departmental storage
- Tape archives
- Cloud storage
- Off-campus resources (ACCESS, National Labs)
Globus can help you share research data with colleagues and co-investigators, or to move data back and forth between a lab workstation and Rivanna/Afton or your personal computer.
Are your data stored at a different institution? At a supercomputing facility? All you need is your institution’s login credentials.
Getting Started
Before you are able to transfer files from or to your personal laptop/workstation, you must set up a Globus Collection on that computer, aka your local endpoint. A collection can be a storage volume or specific file folder on
- Your local workstation,
- A departmental server,
- A “DTN” (Data Transfer Node) connected to Rivanna, Afton, or High-Security Research Standard Storage, or
- A server operated by another university or by a national computing center.
Create a Personal Collection for your laptop
In order to transfer data to/from a lab or personal computer, you must
install the Globus Connect Personal application.
- Open a browser and navigate to https://www.globus.org/globus-connect-personal.
- Select your operating system in the “Install Globus Connect Personal” section and click “install now”. Follow the installation instructions to install Globus Connect Personal.
- Launch the newly installed Globus Connect Personal.
- A box will appear and ask you to login. It will redirect you to a webpage where you will allow access and provide a label for your collection, i.e. your computer. We recommend using something very descriptive, such as
mstk3-laptop or smith-genlab-workstation.
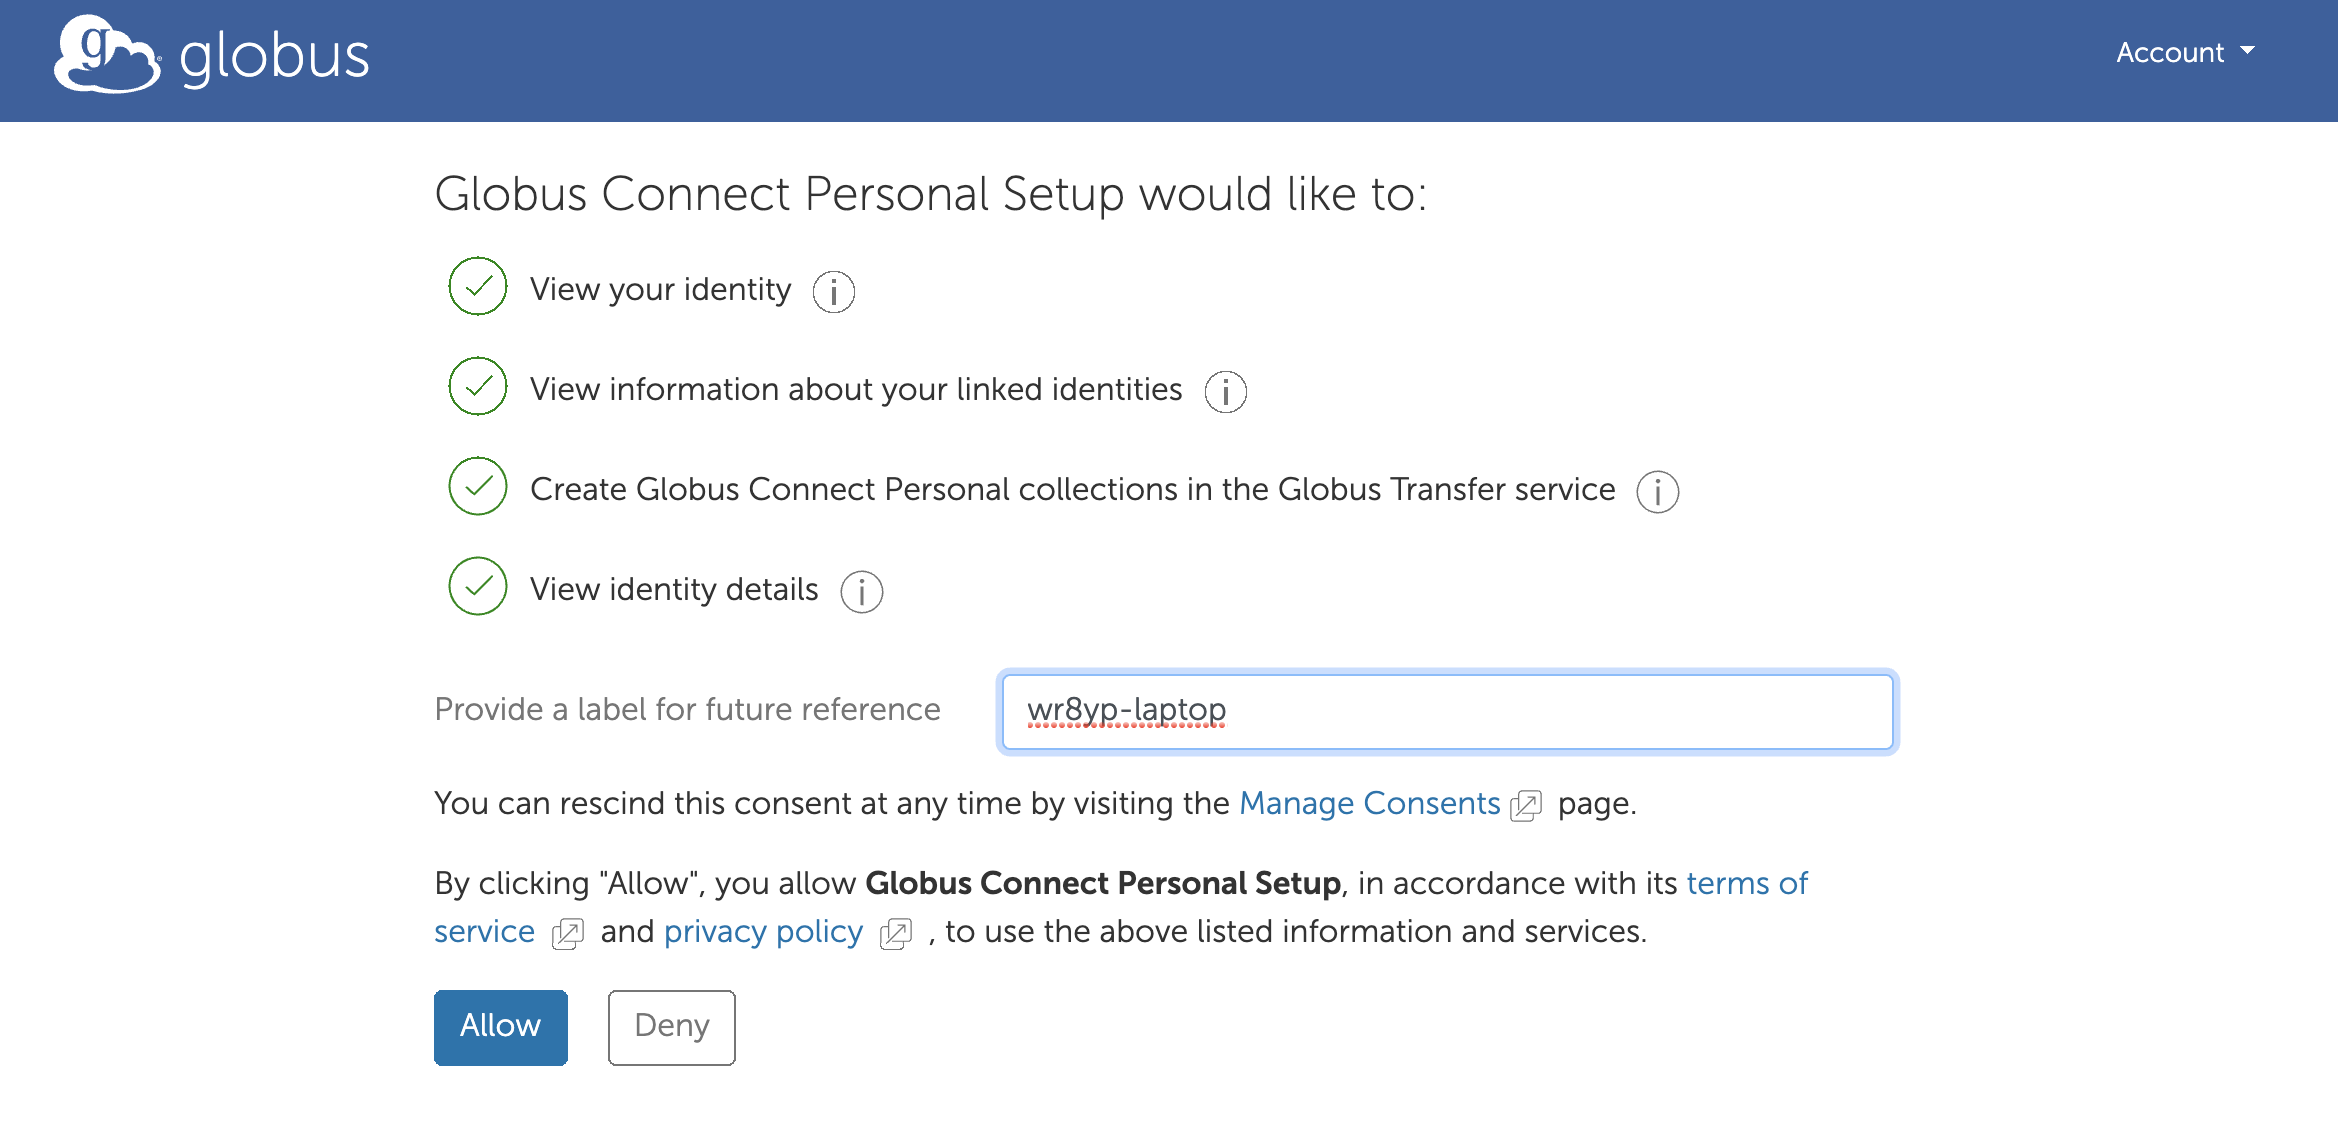
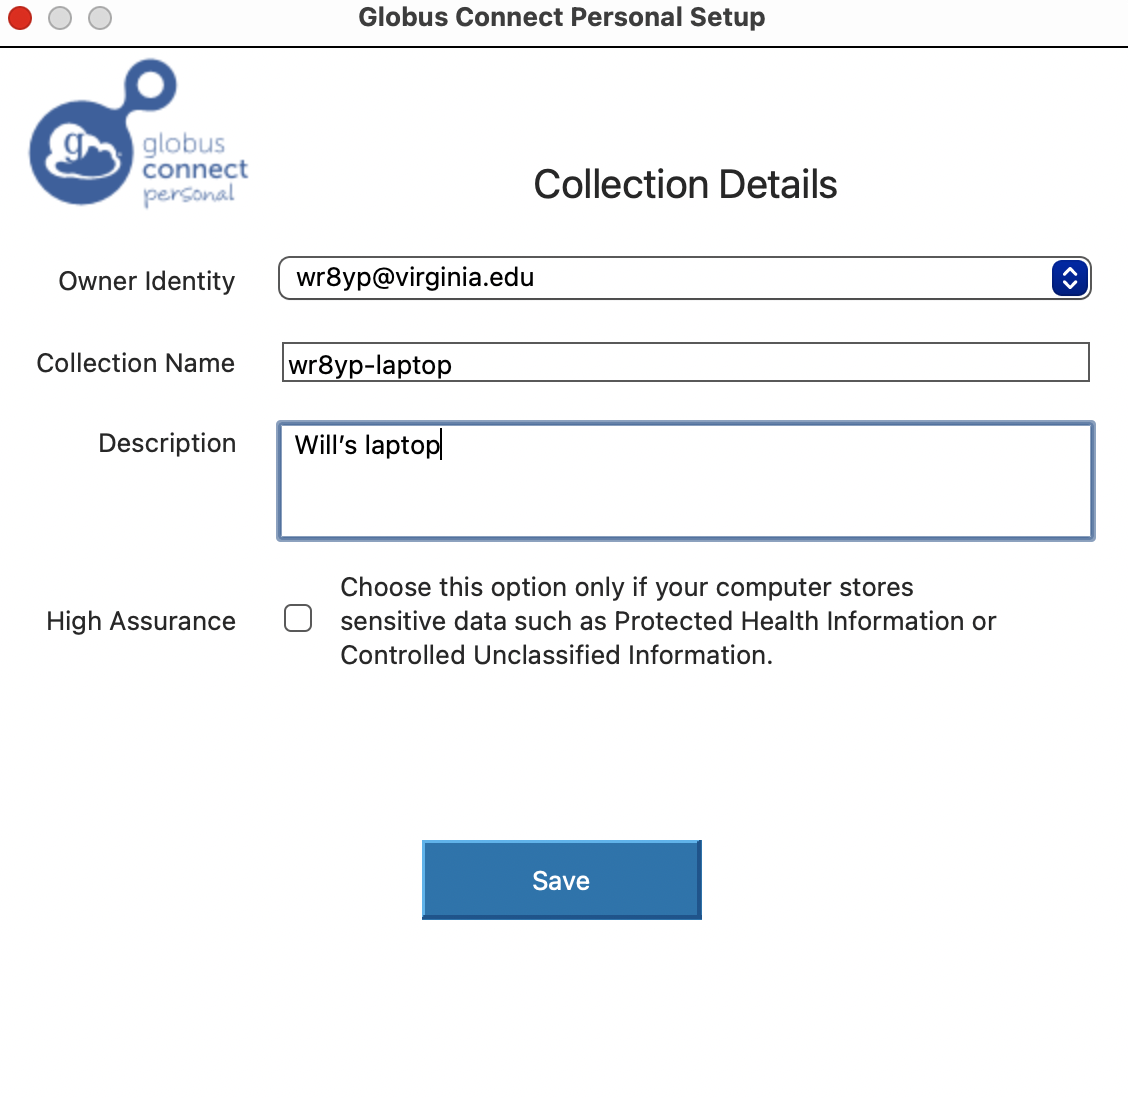
- After clicking allow, a new page will pop up asking you to provide a collection name and a description. Again, use something descriptive like
mstk3-laptop. Do not select the “High Assurance” checkbox.
- Your collection is now set up and ready to use.
On Windows and Mac OSX, the agent will run in the background on your laptop or workstation and will restart when the machine is booted. Click on the agent icon (in the tray for Windows users, in the toolbar for macOS users) to change your preferences or to see the web console. On Linux you must start the agent manually upon rebooting.
Your local computer is now able to serve as a Globus Collection.
Check your new Collection
Globus transfers data between two “collections” or endpoints. You must log in to the Globus website to initiate any transfers.
-
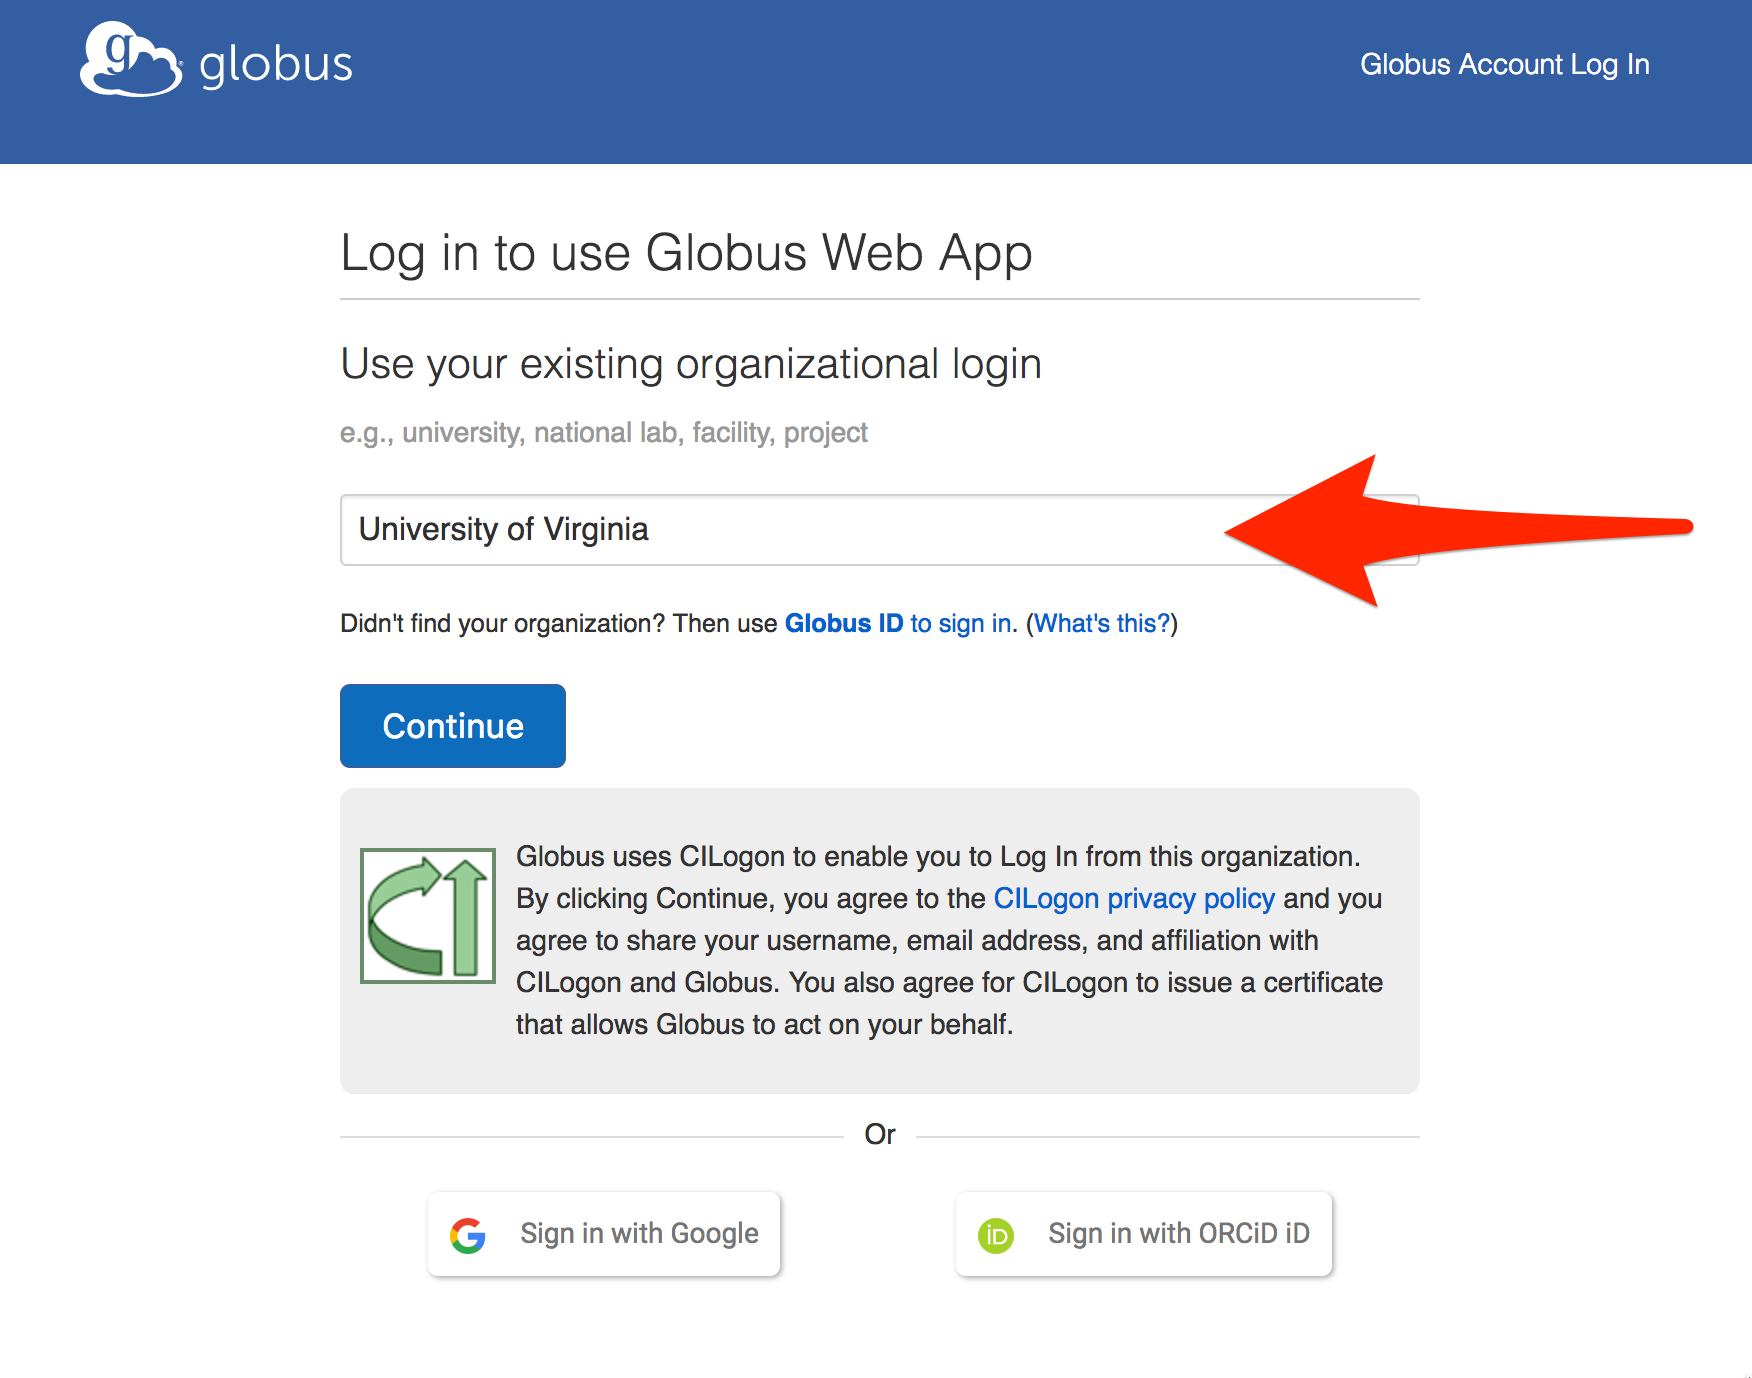
Open a browser window to https://www.globus.org/ and click on Log In.
-
Select “University of Virginia” from the drop-down list of organizations. You may also type the name into the textbox next to the down arrow. Click Continue.
-
Next to you will be directed to sign in using UVA NetBadge. Once logged in you will see the File Manager page:
-
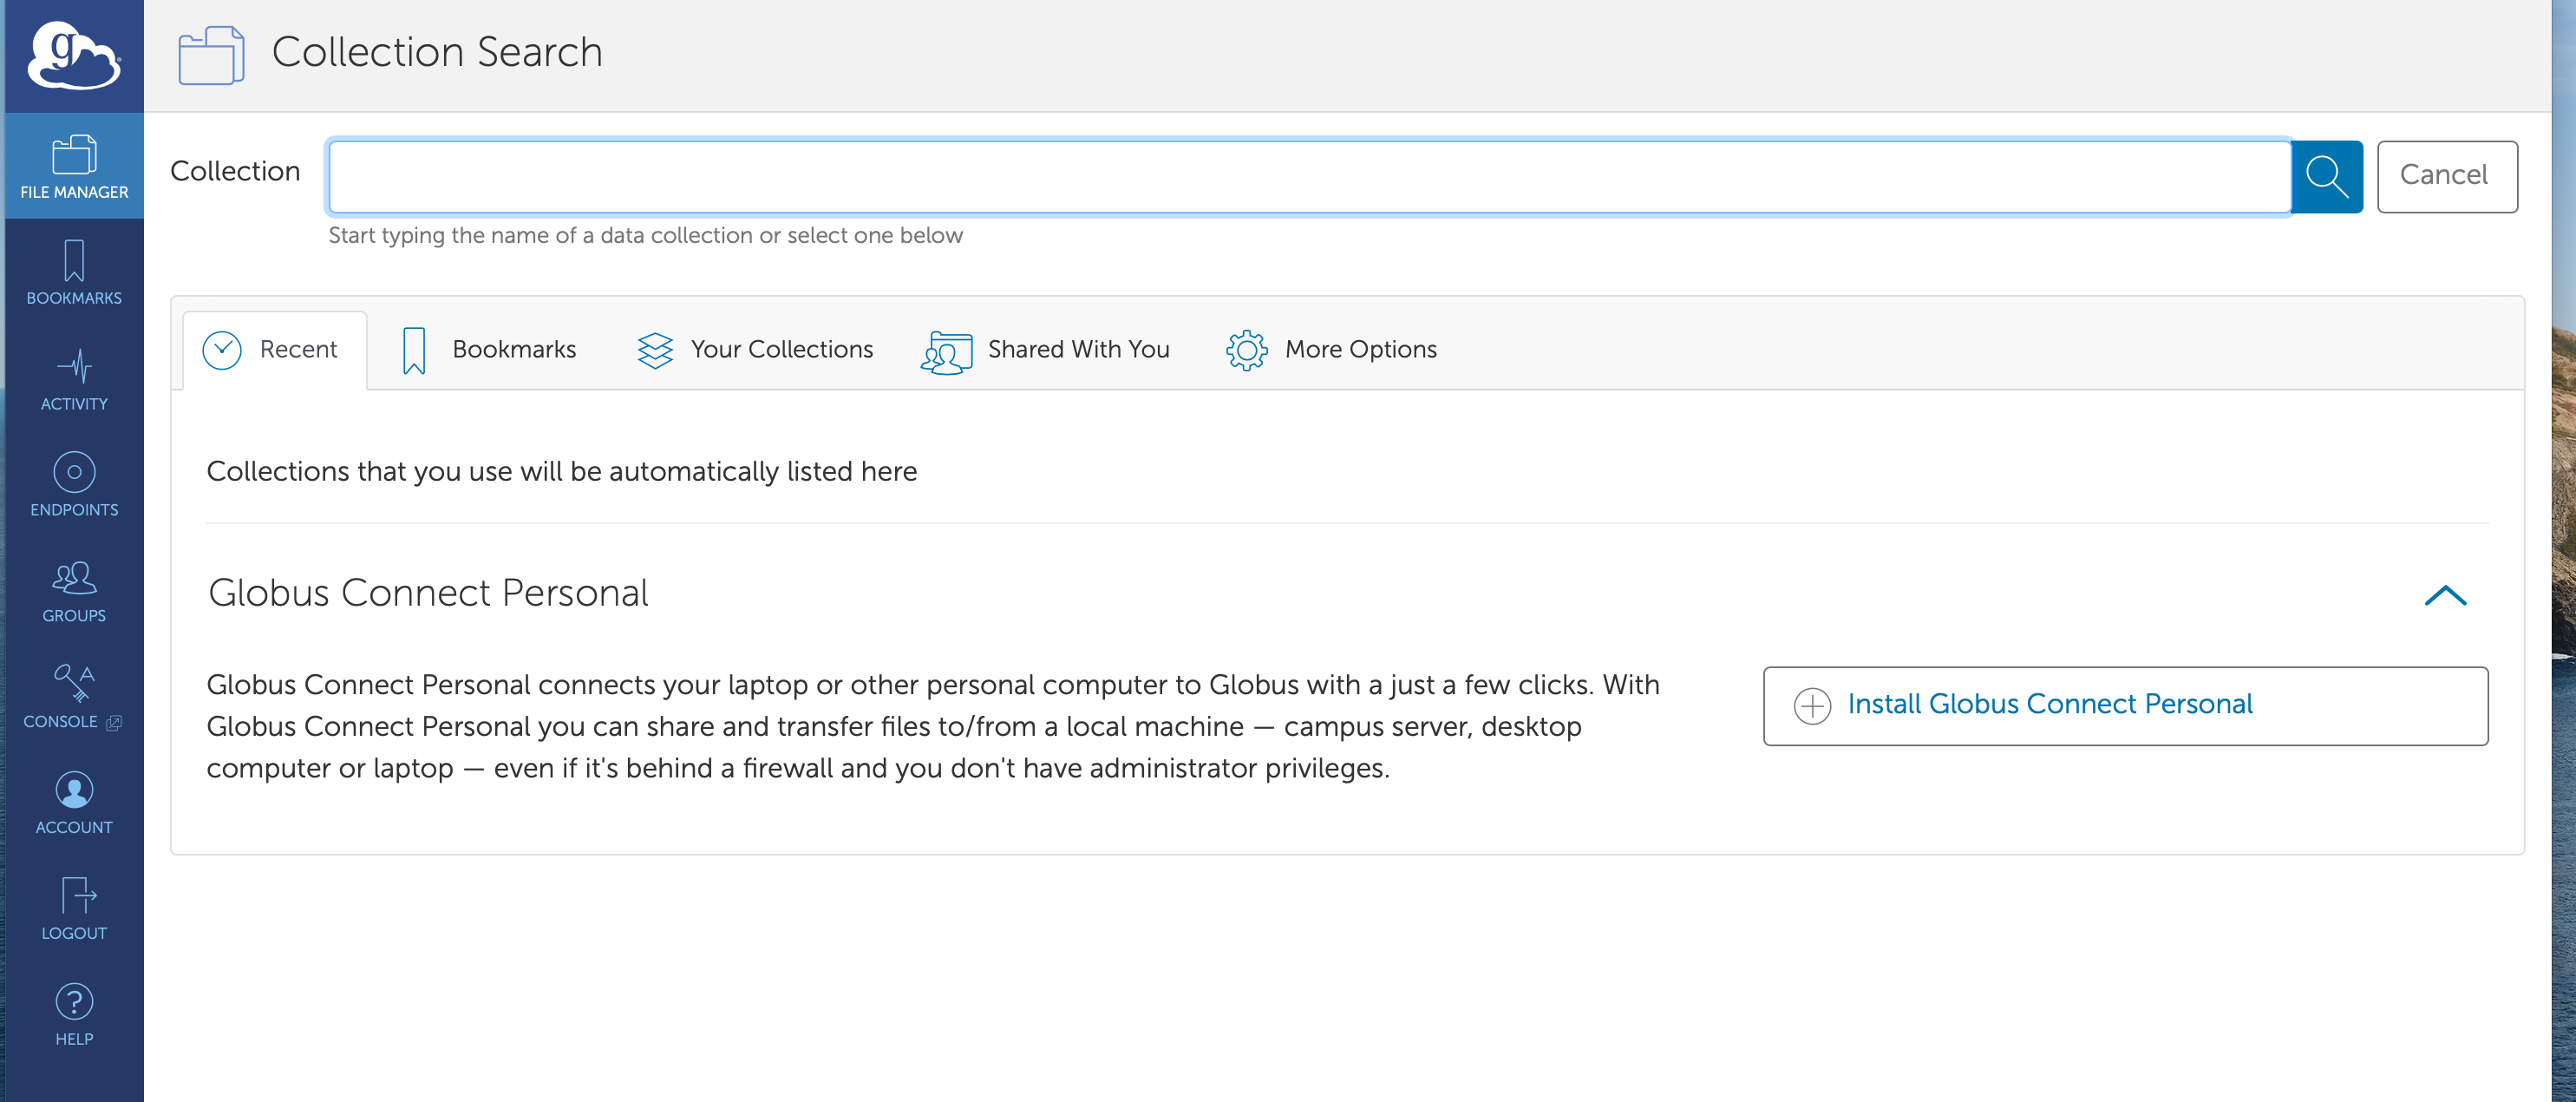
Click the Collection box and you should see your newly created collection
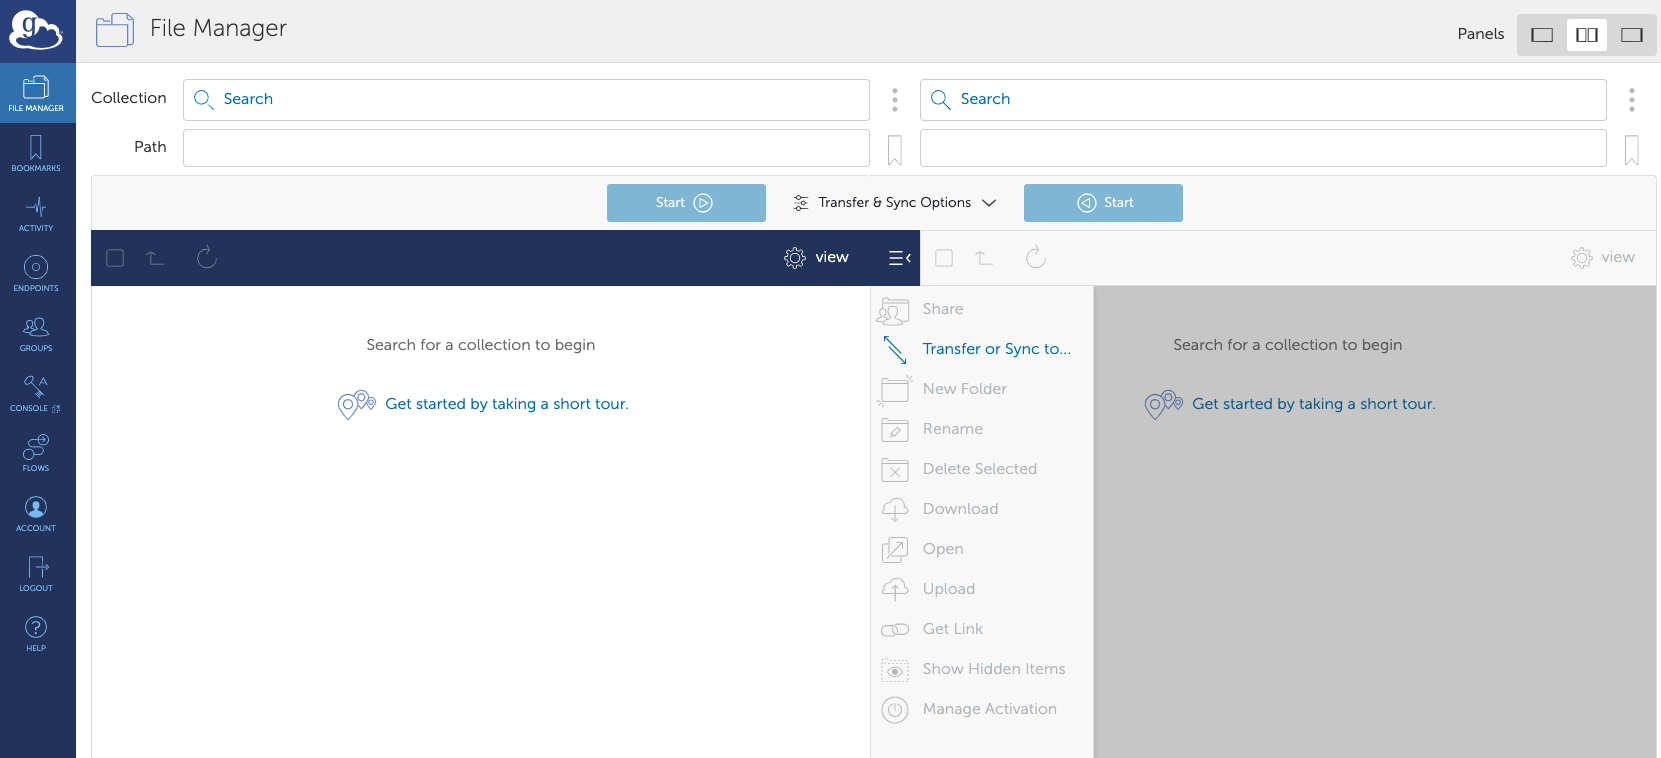
Transferring Files
You can search for the collections to use for your transfer from the File Manager at the Globus website, then use their Web interface to initiate and monitor your transfers.
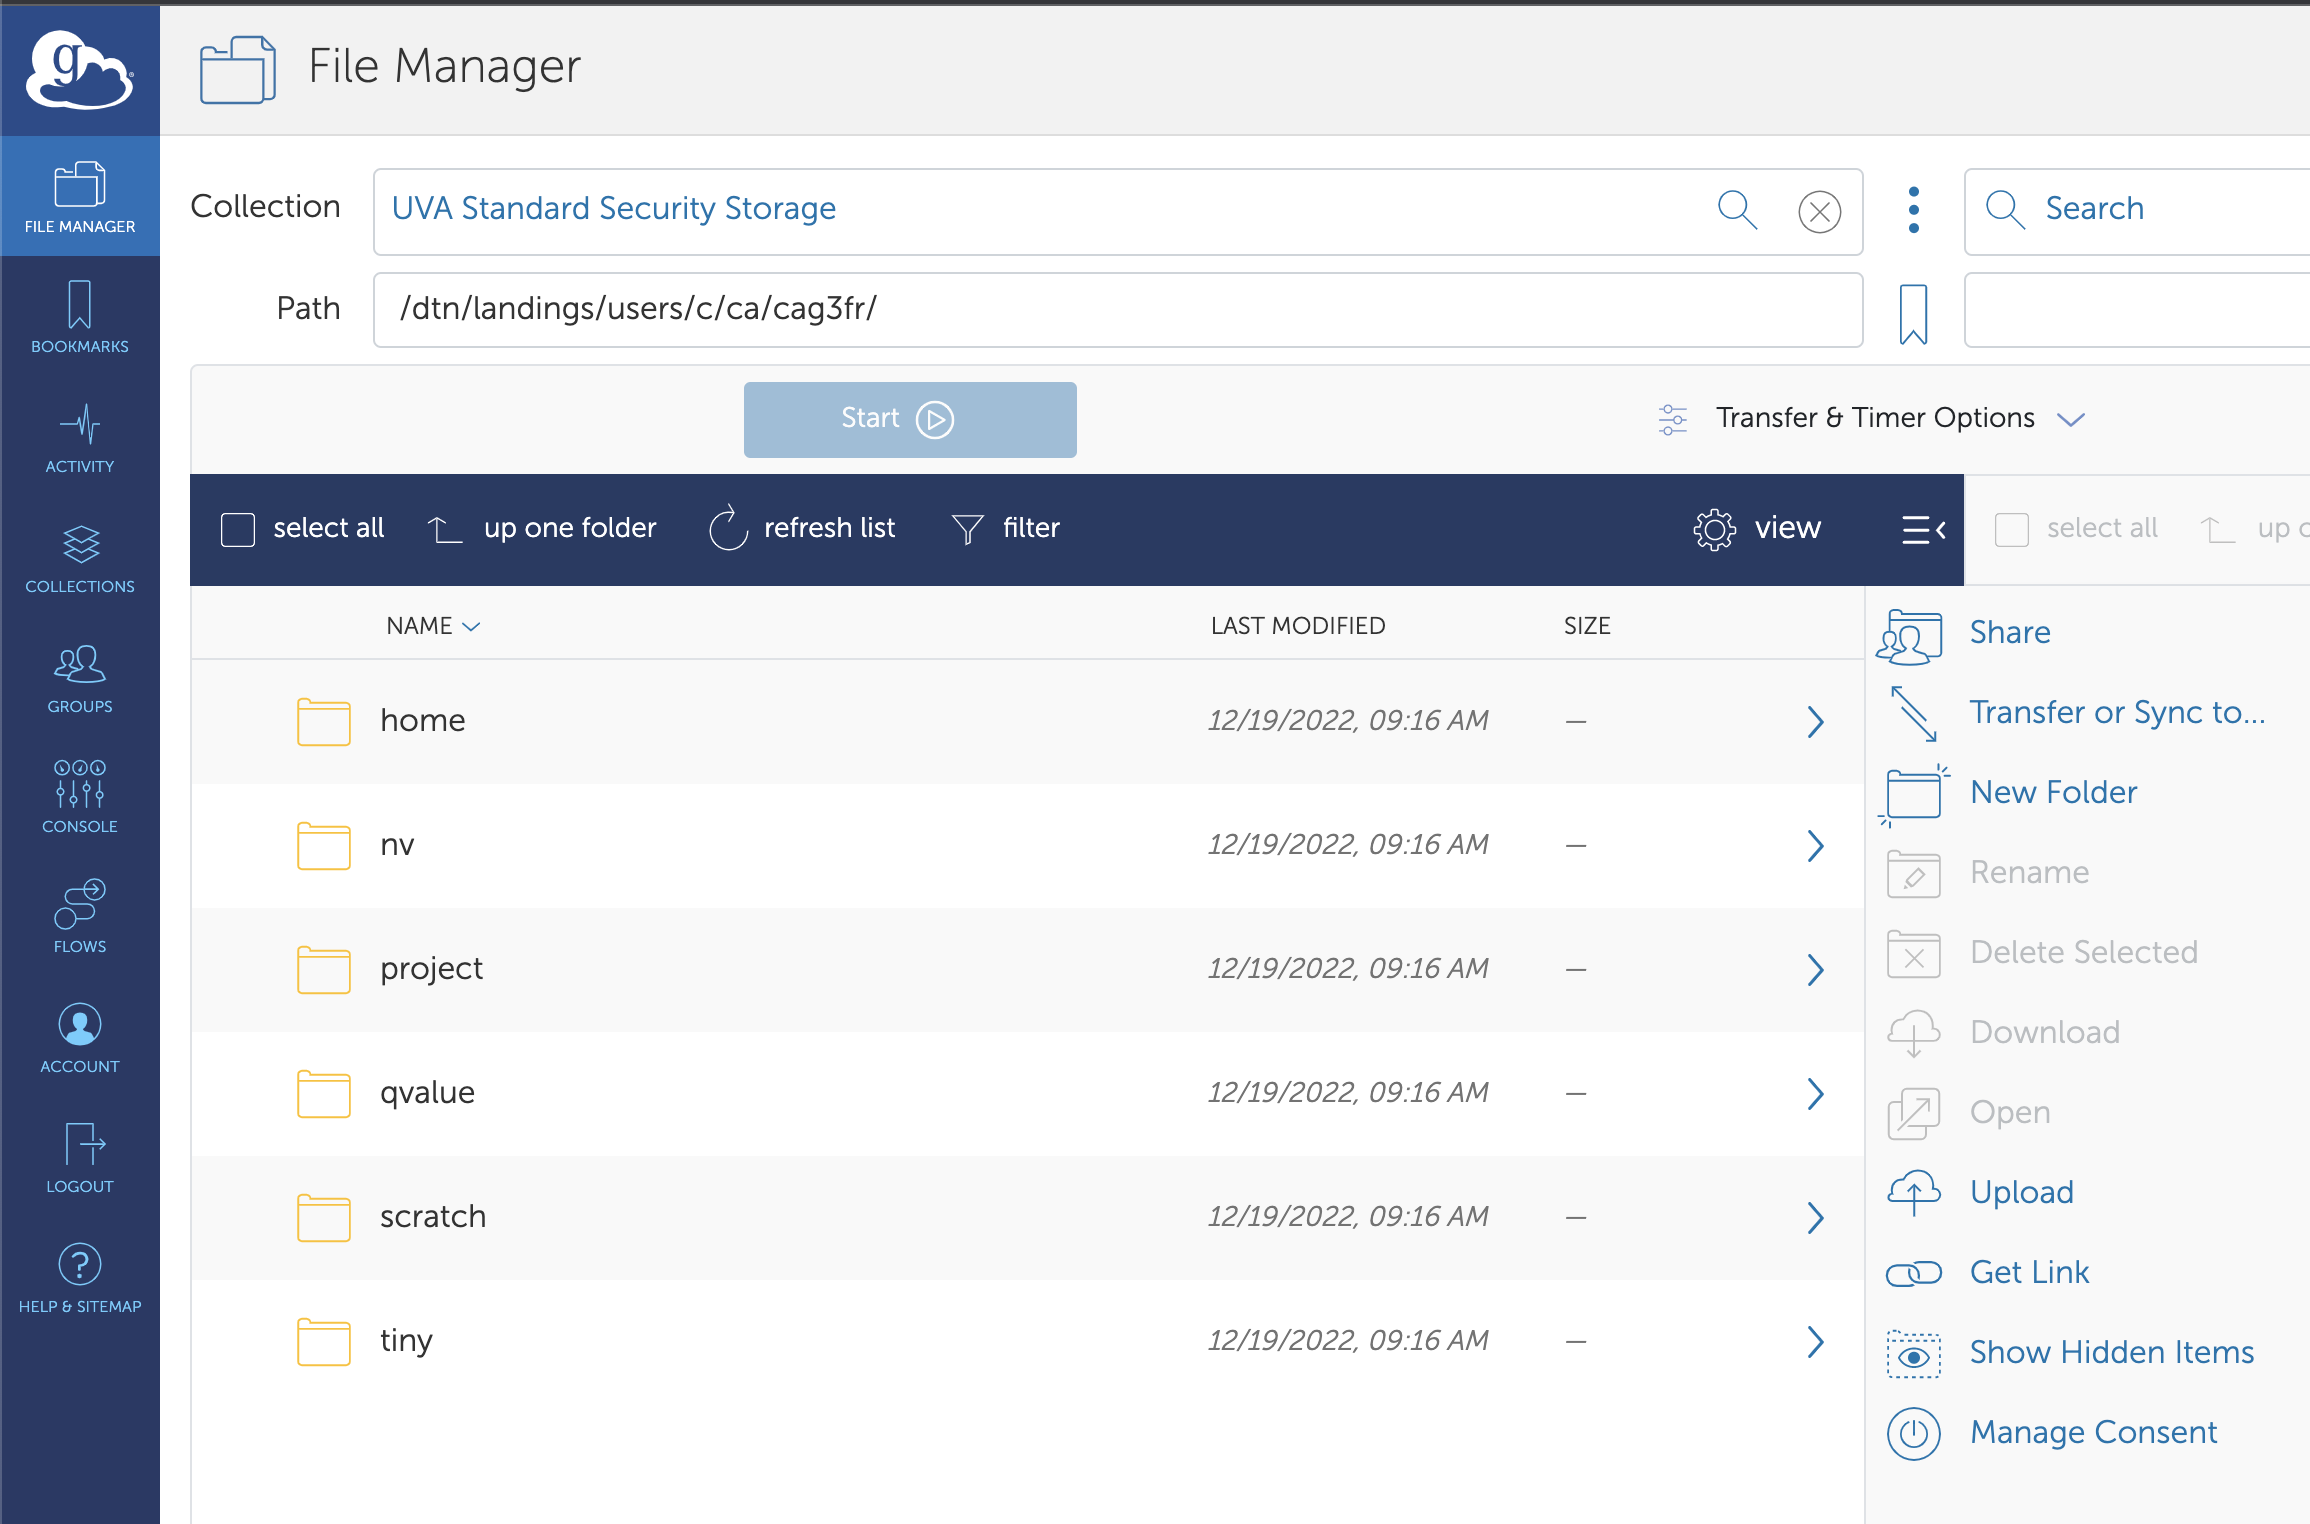
The official UVA managed collections are:
UVA Standard Security Storage - generally available; maps to Rivanna/Afton home directories, scratch, Research Standard & Research Project storage.UVA IVY-DTN - available to Ivy secure platform users, for moving files into High-Security Research Standard Storage.
Globus is the only permitted data-transfer protocol for highly sensitive data. To transfer data to High-Security Research Standard Storage, please see the special instructions here.
You can transfer files to or from your personal collection to a managed collection, one run either by UVA or by another institution. You can transfer files between two managed collections. You cannot transfer files from one personal collection to another personal collection. If you wish to do this, contact Research Computing to convert at least one personal collection to a Globus Plus collection.
To transfer a file:
-
From the File Manager page, select a collection by clicking on the “Collection” link near the top of the screen (“start here, select a collection”). Start typing the name of the collection to see the options containing the string as you type.
-
Once the collection is found, click on its link. Wait while it finds your folders. When complete, click on “Transfer or sync to…” on the right sidebar. If you do not remember the exact name of the second collection, click the magnifying glass to search. If your second collection is one you have registered with Globus, you may also click Your Collections. This will open a second pane. Either pane may be the source or destination.
-
Select a file or folder from your “source” pane.
-
Click the Start > or < Start button at the bottom of the pane to begin the transfer into the “destination” pane.
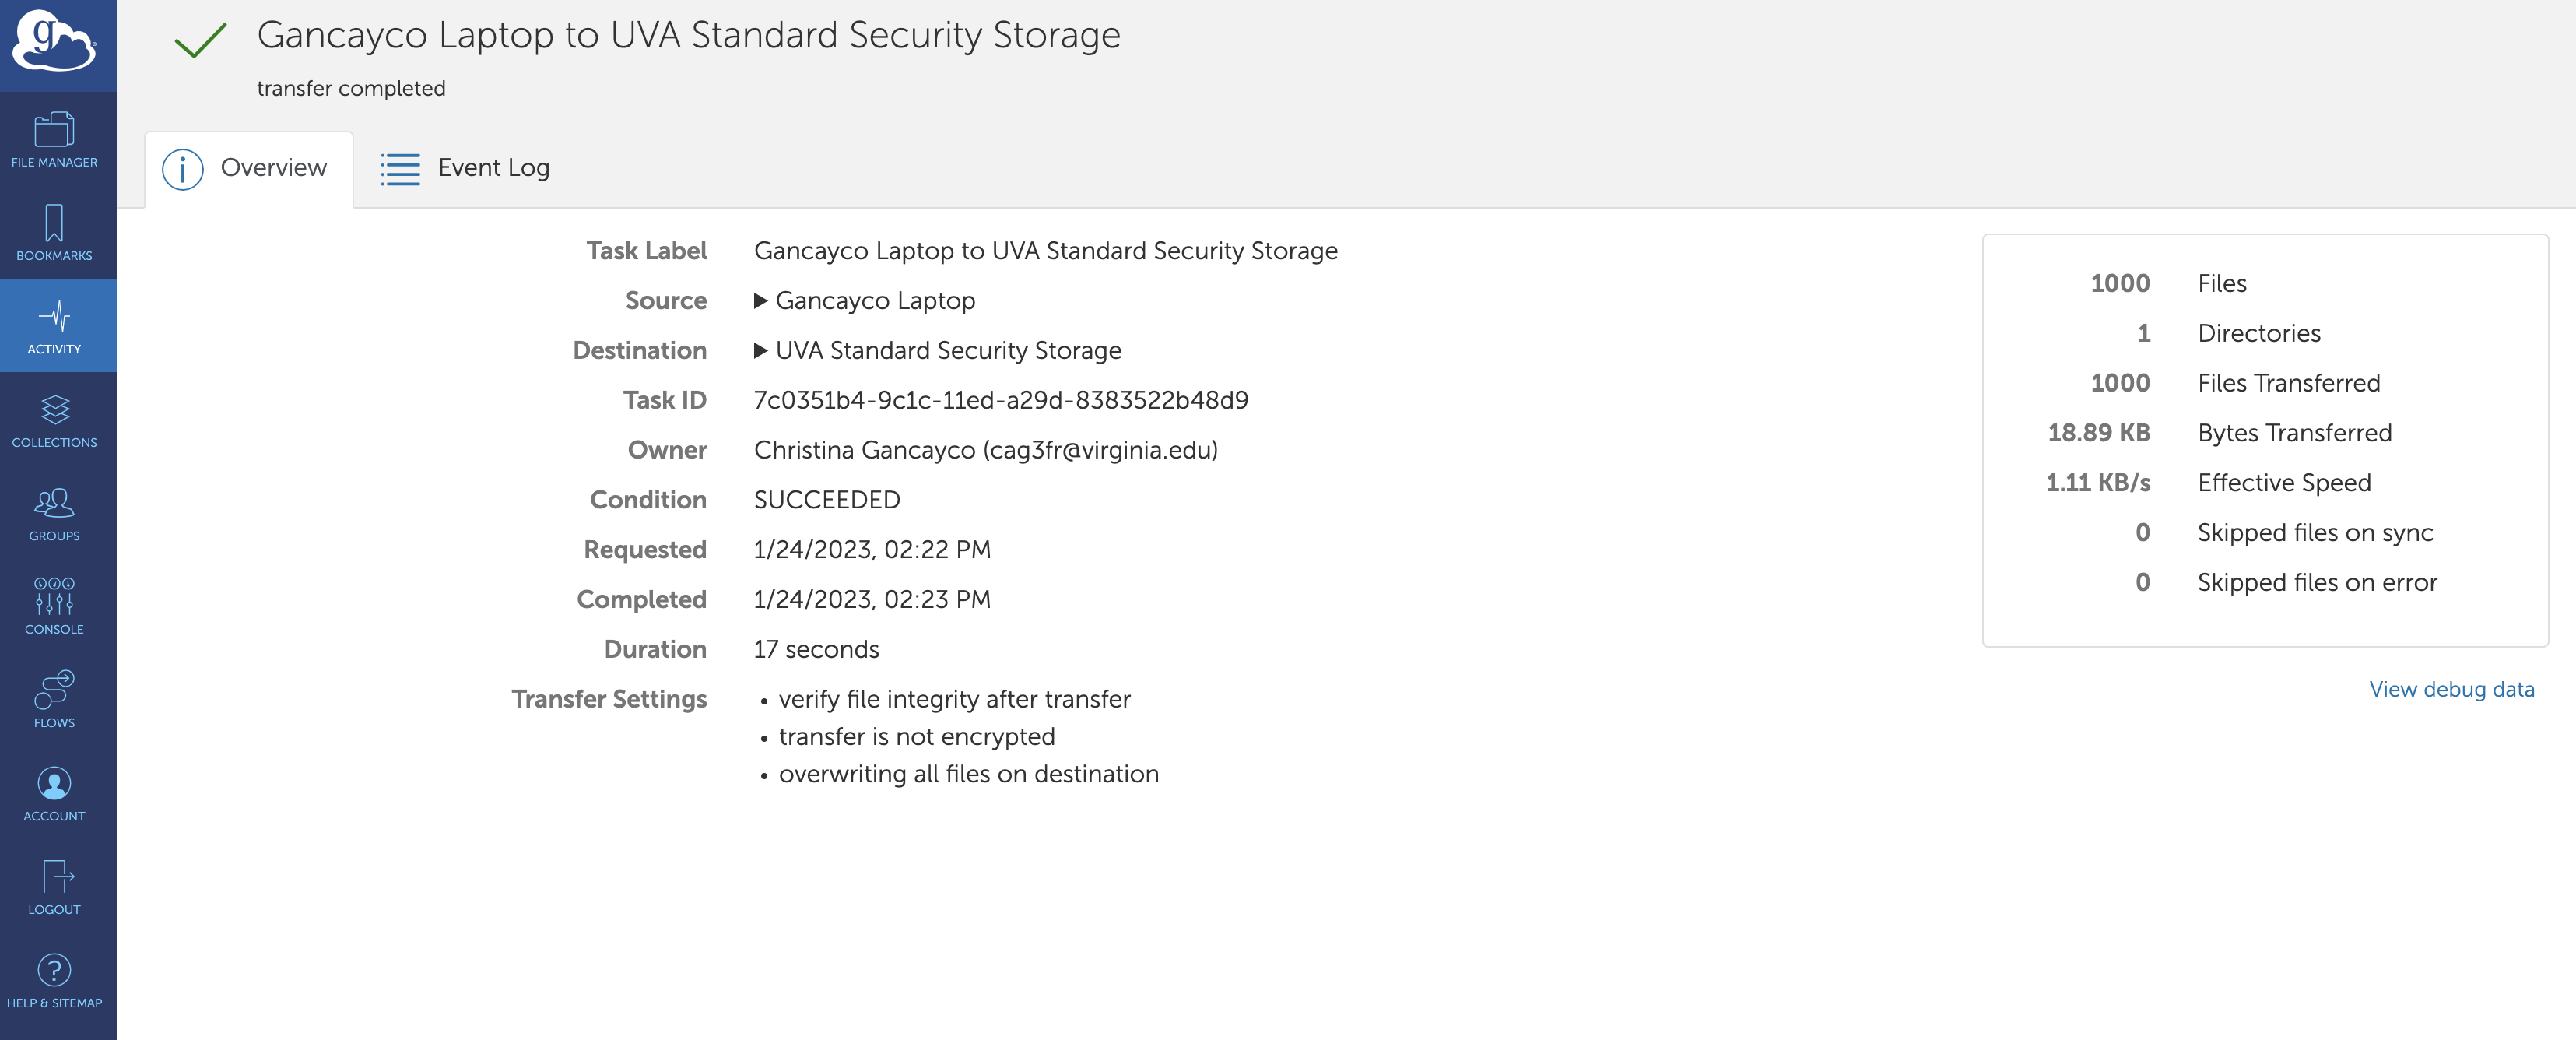
After you initiate a transfer, it will be assigned a Task ID that you can use to reference that specific transfer. This is a useful way of identifying transfers when checking on the status of a job or viewing your past Globus activity.
Your transfer may take several minutes or hours to complete depending upon the size of the data. Globus transfers are persistent, which means that if there is a network interruption, or one collection is turned off, the transfer will resume whenever the connection is restored. The transfer takes place in the background, so once it is assigned an ID and you receive the notification that it has begun, you can log out from the Globus page.
Note: Globus allows you to schedule and repeat data transfers through its web app or command-line interface. To set a specific start time and choose a repeat interval to create recurring transfers click on the Transfer & Timer Options pulldown menu.
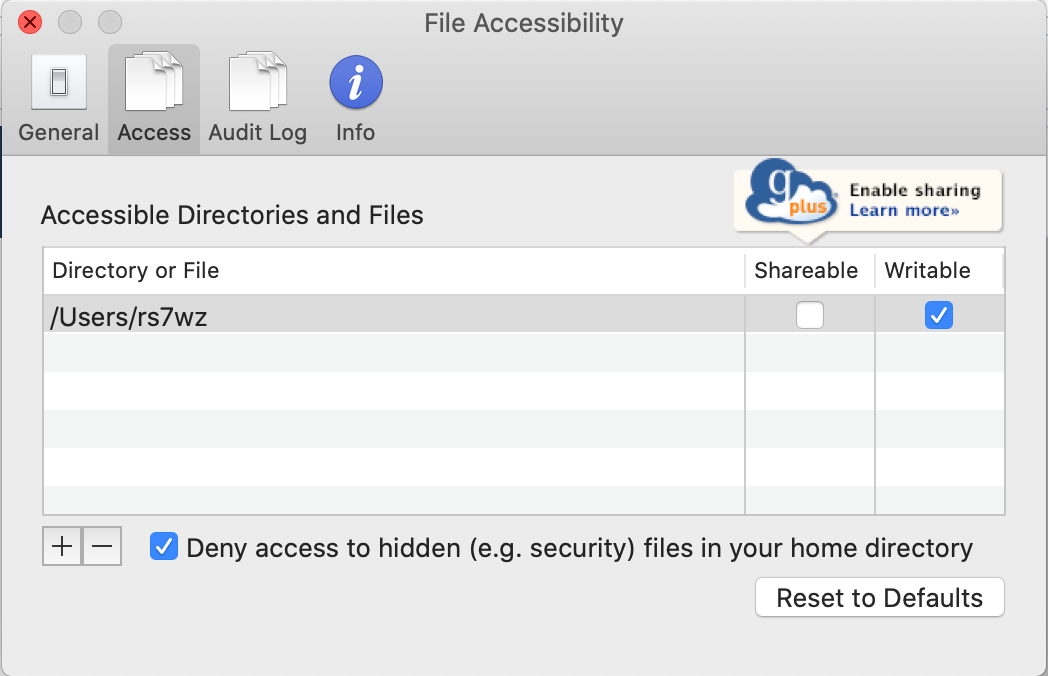
The Globus Personal Connection application will show only a limited default set of paths on your computer. If you need to use another folder, such as one on an external hard drive, as the source or destination, you will have to add it. With the Globus Personal Collection running, click on the g logo in your taskbar or tray. Mac: go to Preferences/Access. Click the + button to add a path. Windows: Options/Access, click + to add the path to the drive. Navigate as usual to the location you wish to add.
Monitoring Transfer Activity
You can check on the status of your transfer using the Task ID.
From the lefthand navigation bar of the Globus Connect manager, click on “Activity”. Or visit https://app.globus.org/activity
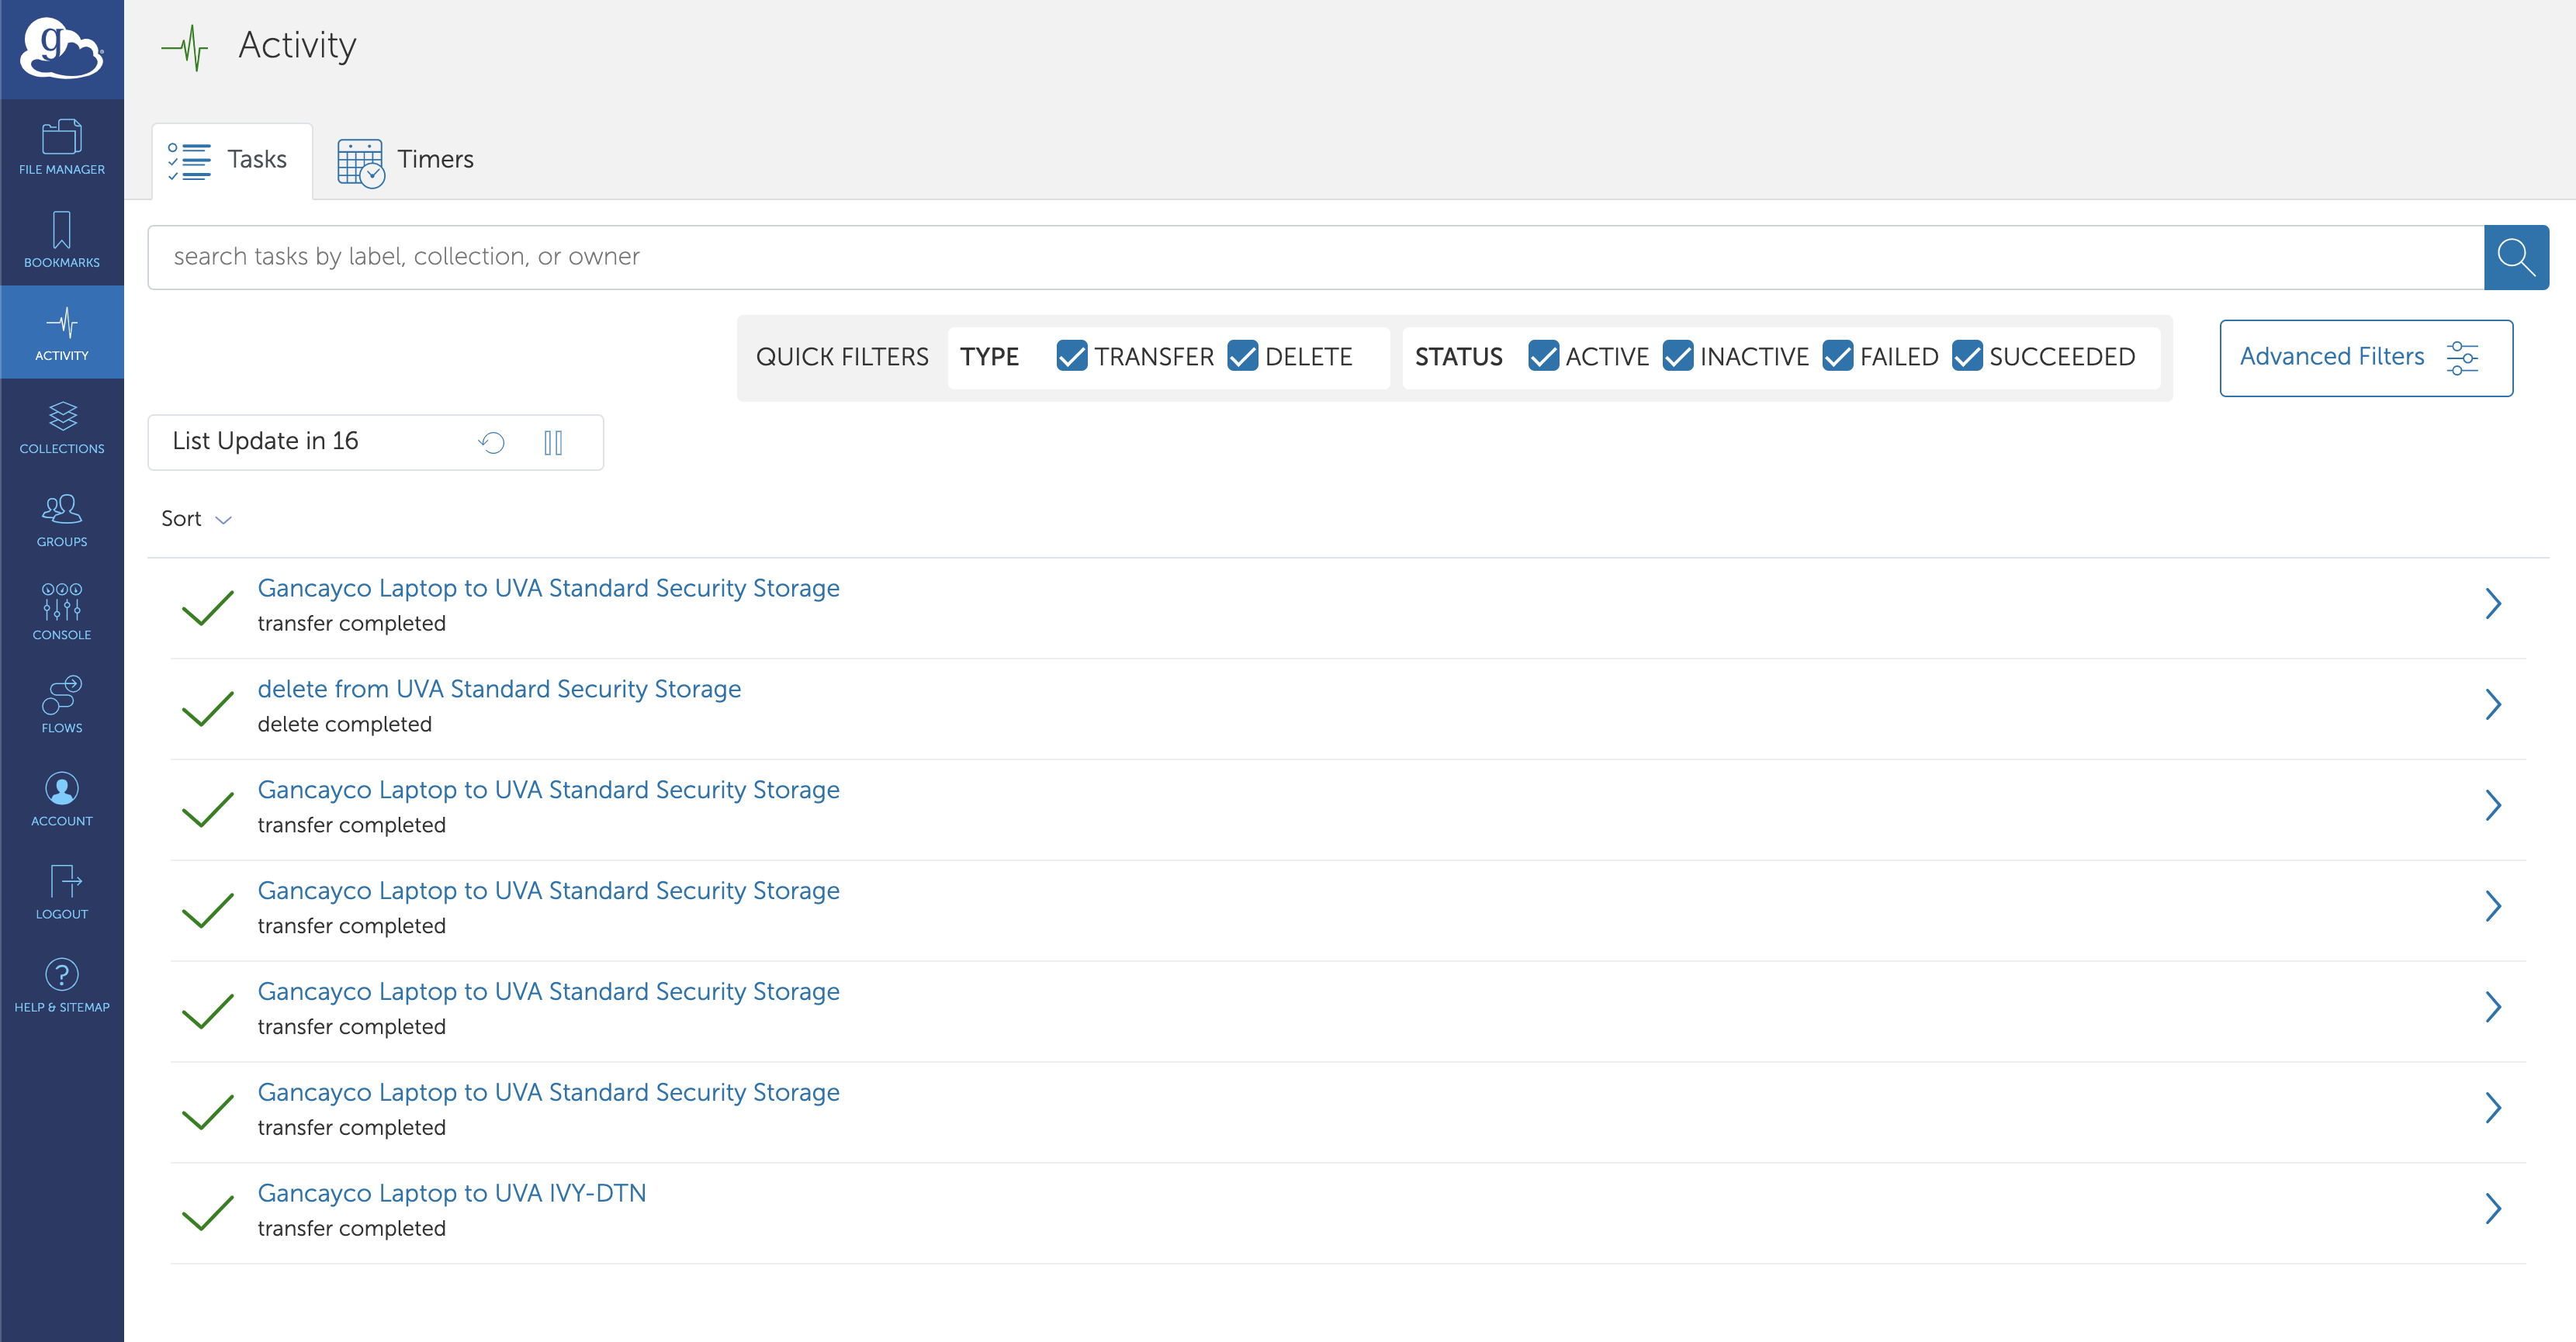
Here you will see a list of your current and past transfer jobs. Click on a job and you will get details and status.
Notifications
Users are notified via email for both successful and failed transfers. The email looks something like this, and provides a URL for more information:
TASK DETAILS
Task ID: 7c0351b4-9c1c-11ed-a29d-8383522b48d9
Task Type: TRANSFER
Status: SUCCEEDED
Source: Gancayco Laptop (e6b14dc6-34a8-11ed-ba40-d5fb255a47cc)
Destination: UVA Standard Security Storage (e6b338df-213b-4d31-b02c-1bc2c628ca07)
Label: n/a
https://app.globus.org/activity/7c0351b4-9c1c-11ed-a29d-8383522b48d9/overview
Sharing Folders
You can share folders to either specific individuals, or to groups that you create and manage within Globus. A group must be populated with at least one user. A shared folder must be created on a managed collection or on a Globus Plus collection; personal collection can receive shared folders but cannot create shares.
- Open the Globus web interface and log in using UVA Netbadge.
- From the Transfer Files interface, log in to the UVA Standard Security Storage collection as described above.
- Navigate in the folder structure of that collection until you find the folder you want to share. Highlight it.
- Next, select the Share link on the right side of the files window.
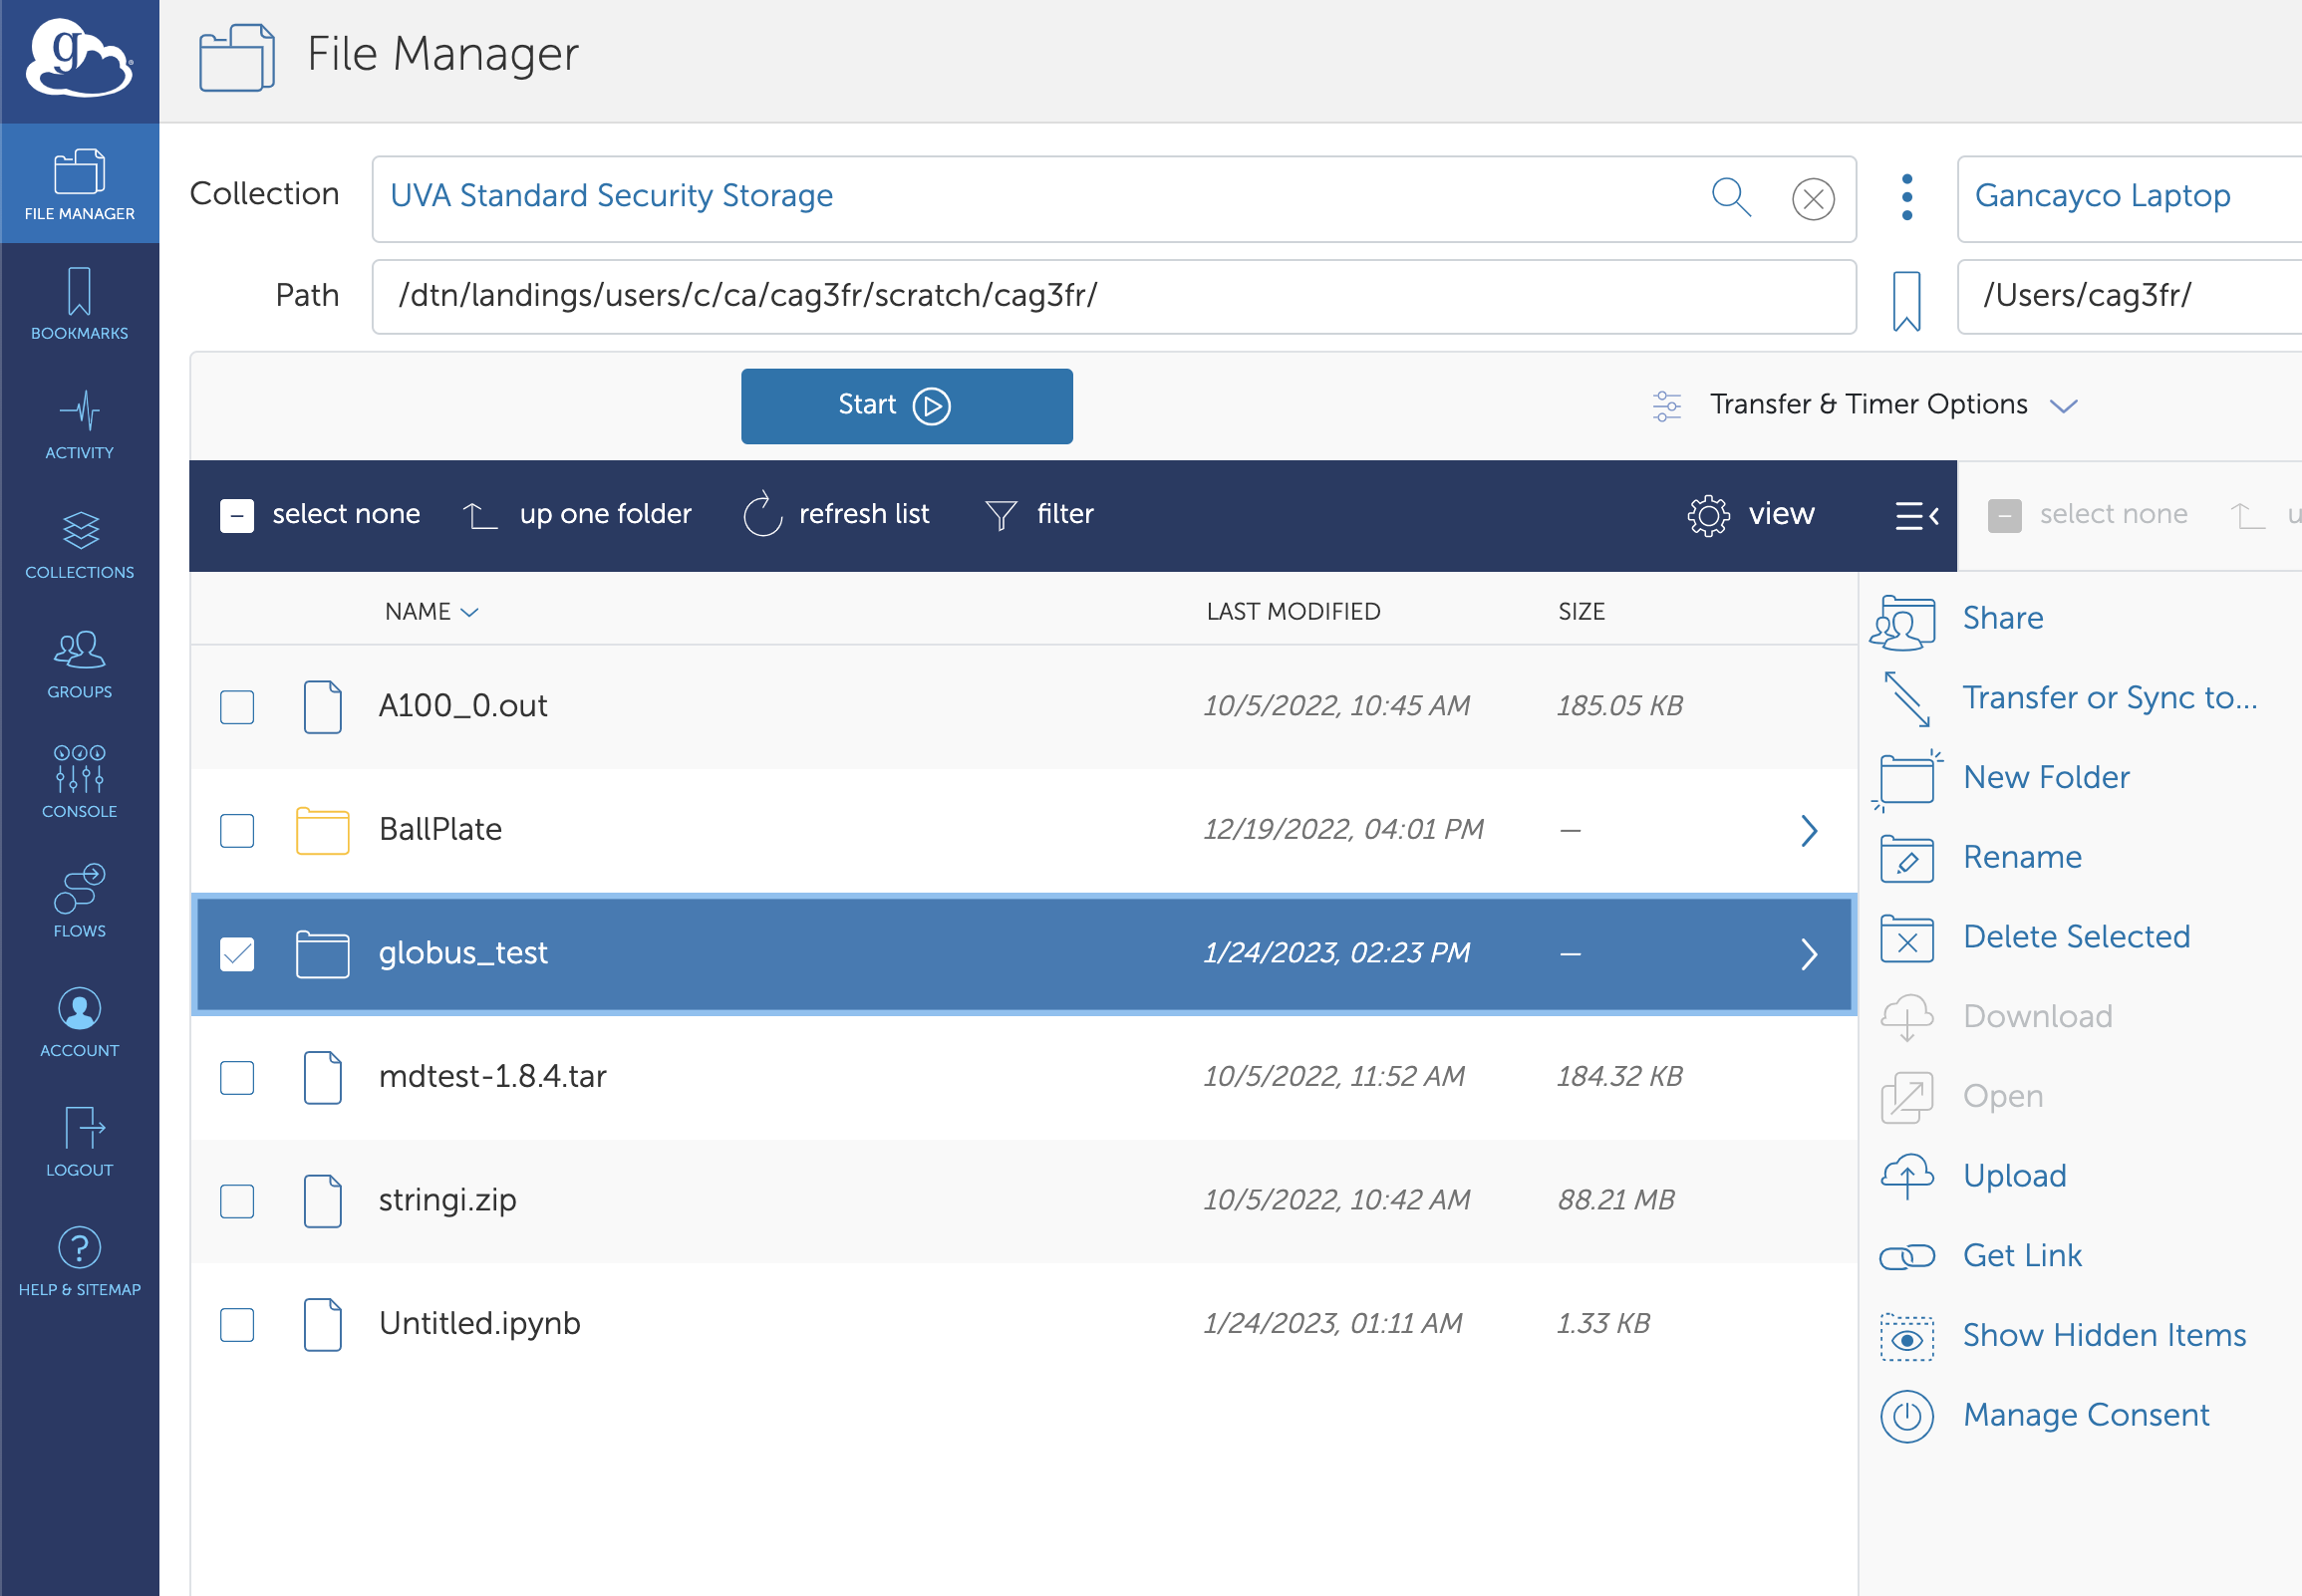
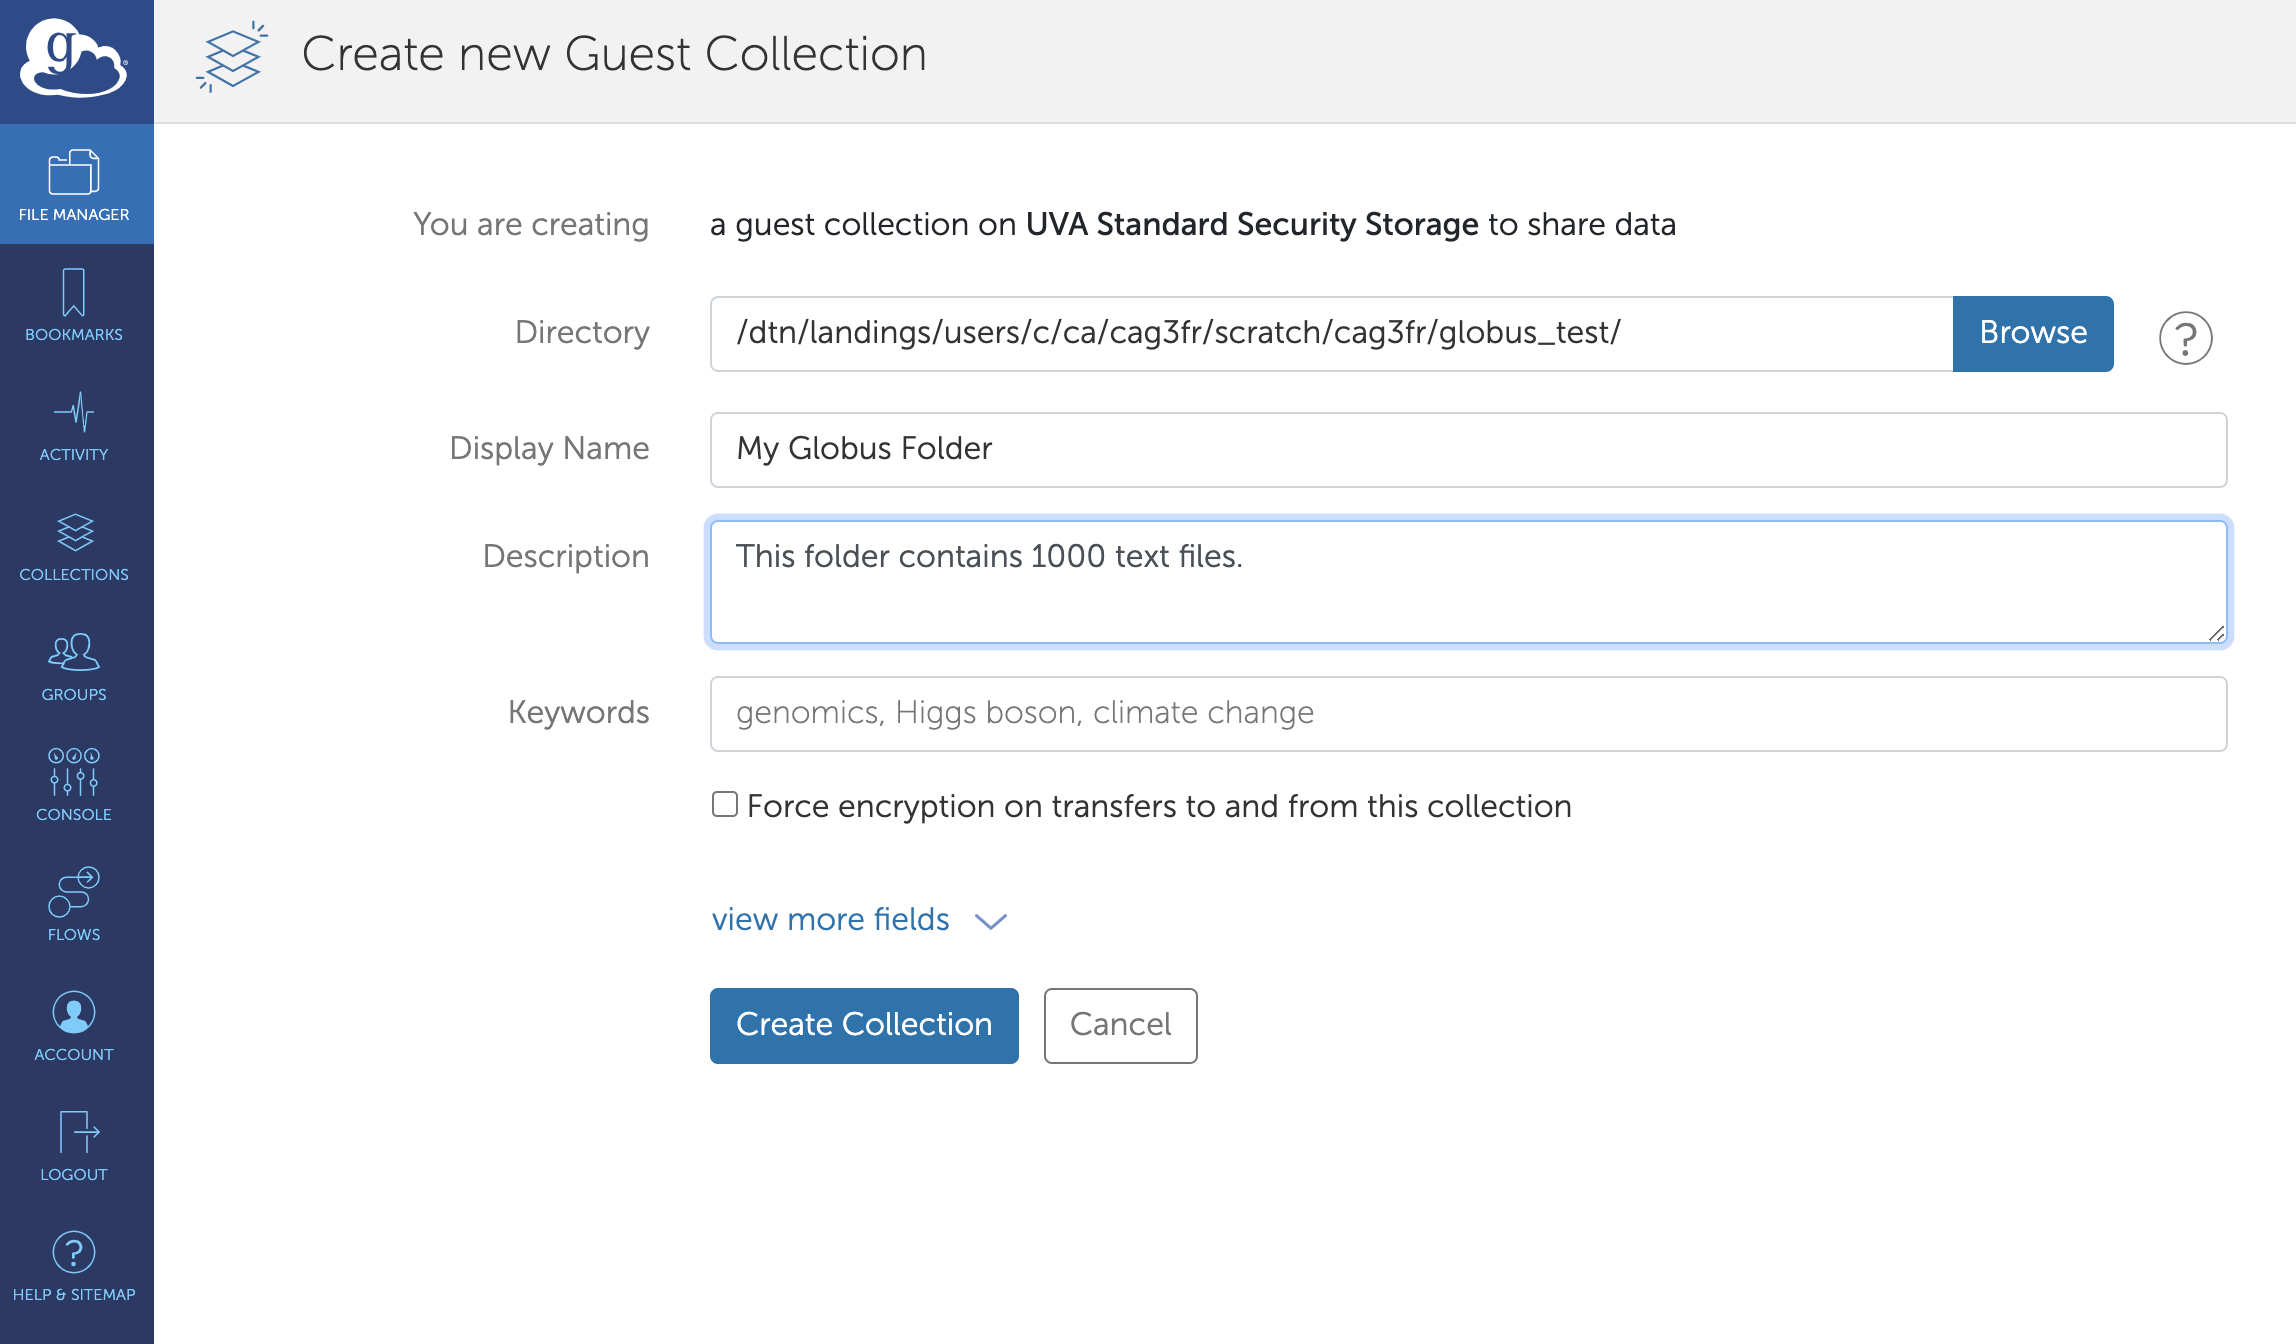
- Globus regards shared folders as collections, so you must create a new collection to share the folder. Clicking on Share allows you to “Add a Guest Collection.” You can only create and manage guest collections for directories or files that you own and can access. Provide a Display Share Name (required) and a description (optional).
- Click “Create Share”. Your new share will be created.
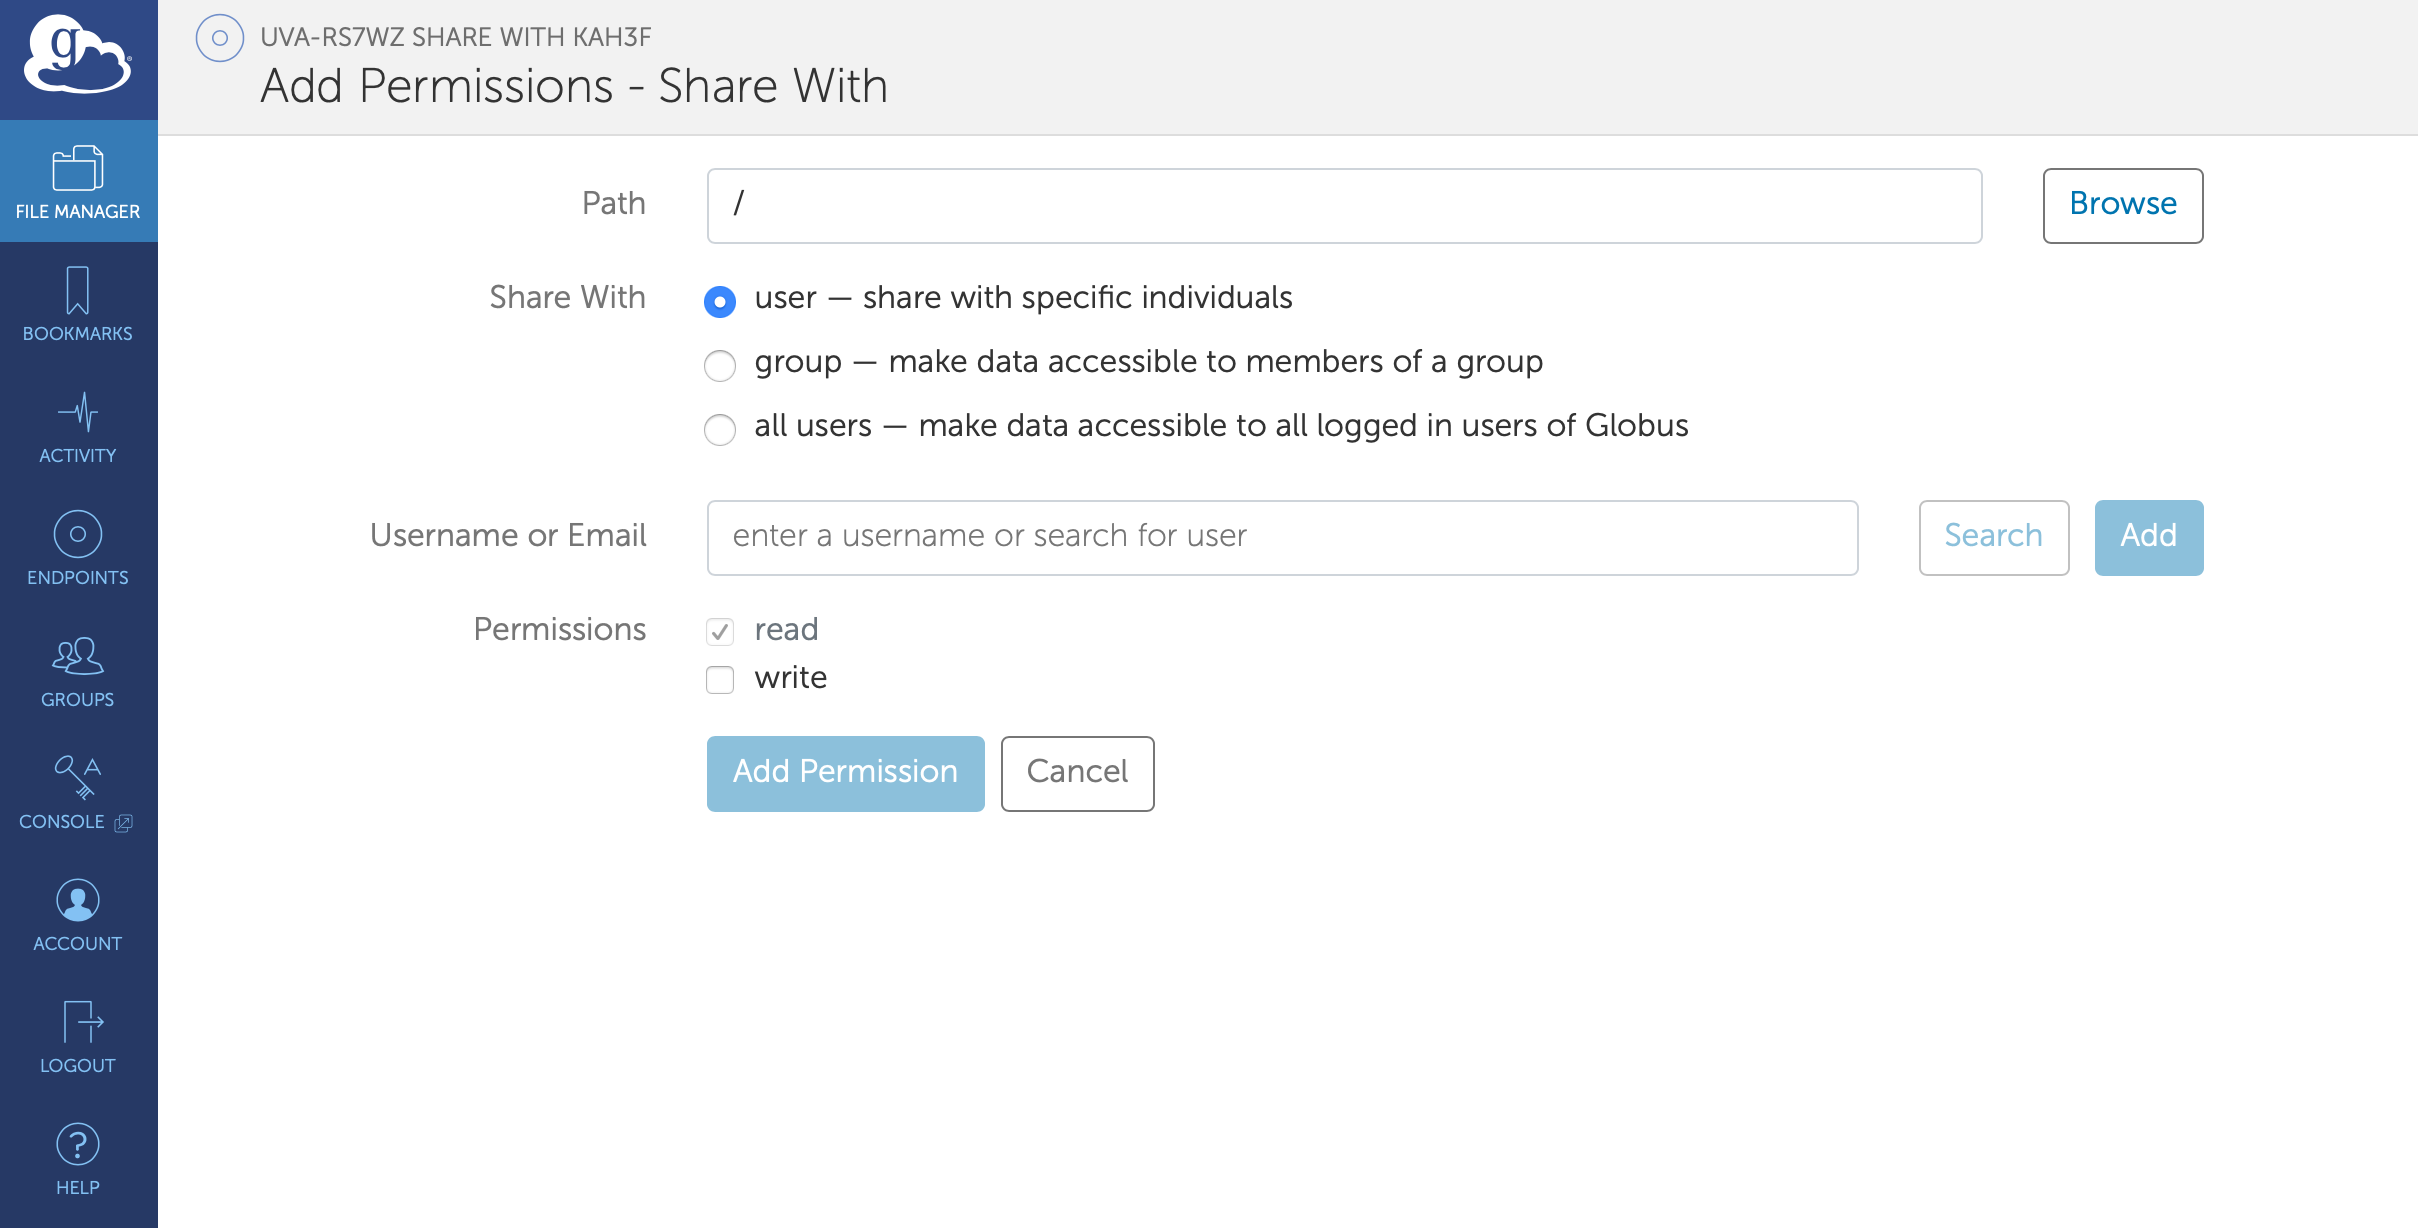
- Now click “Add Permissions - Share With” in the upper right. You must go through this even if you do not change permissions from the default.
- Path - Leave this set to
/ since it refers to the path relative to the directory you are sharing from.
- Share With - Decide whether you want to share with individual users or with a group. Please do not set this to “All Users” or “Public”. If you share with an individual user, follow the instructions below. If you choose to share with a group, you will first need to create that and add users to it by using the GROUPS tab at the top of the page.
- Identity/E-mail - You can look up other Globus users by searching for a part of their name or institution. If you cannot find the individual, you should contact them to make sure they have signed in to Globus at least once. Generally, users at other colleges and universities can be identified with the simple form of their email address, like
mst3k@virginia.edu or jdoe@mit.edu, etc. Users who are unaffiliated with a university can still sign in to Globus using Google (identified as username@gmail.com) or by creating a username and password in Globus (identified as userid@globusid.org)
–If you enter your collaborator’s email address, it must exactly match the one associated with the recipient’s Globus ID.
- Permissions - You can specify whether this user has access to read or write to your share. Keep in mind that permission to write to the folder also grants the recipient the ability to delete files within in.
- Add a message if you wish, then click “Add Permission” whether you made any changes or not.
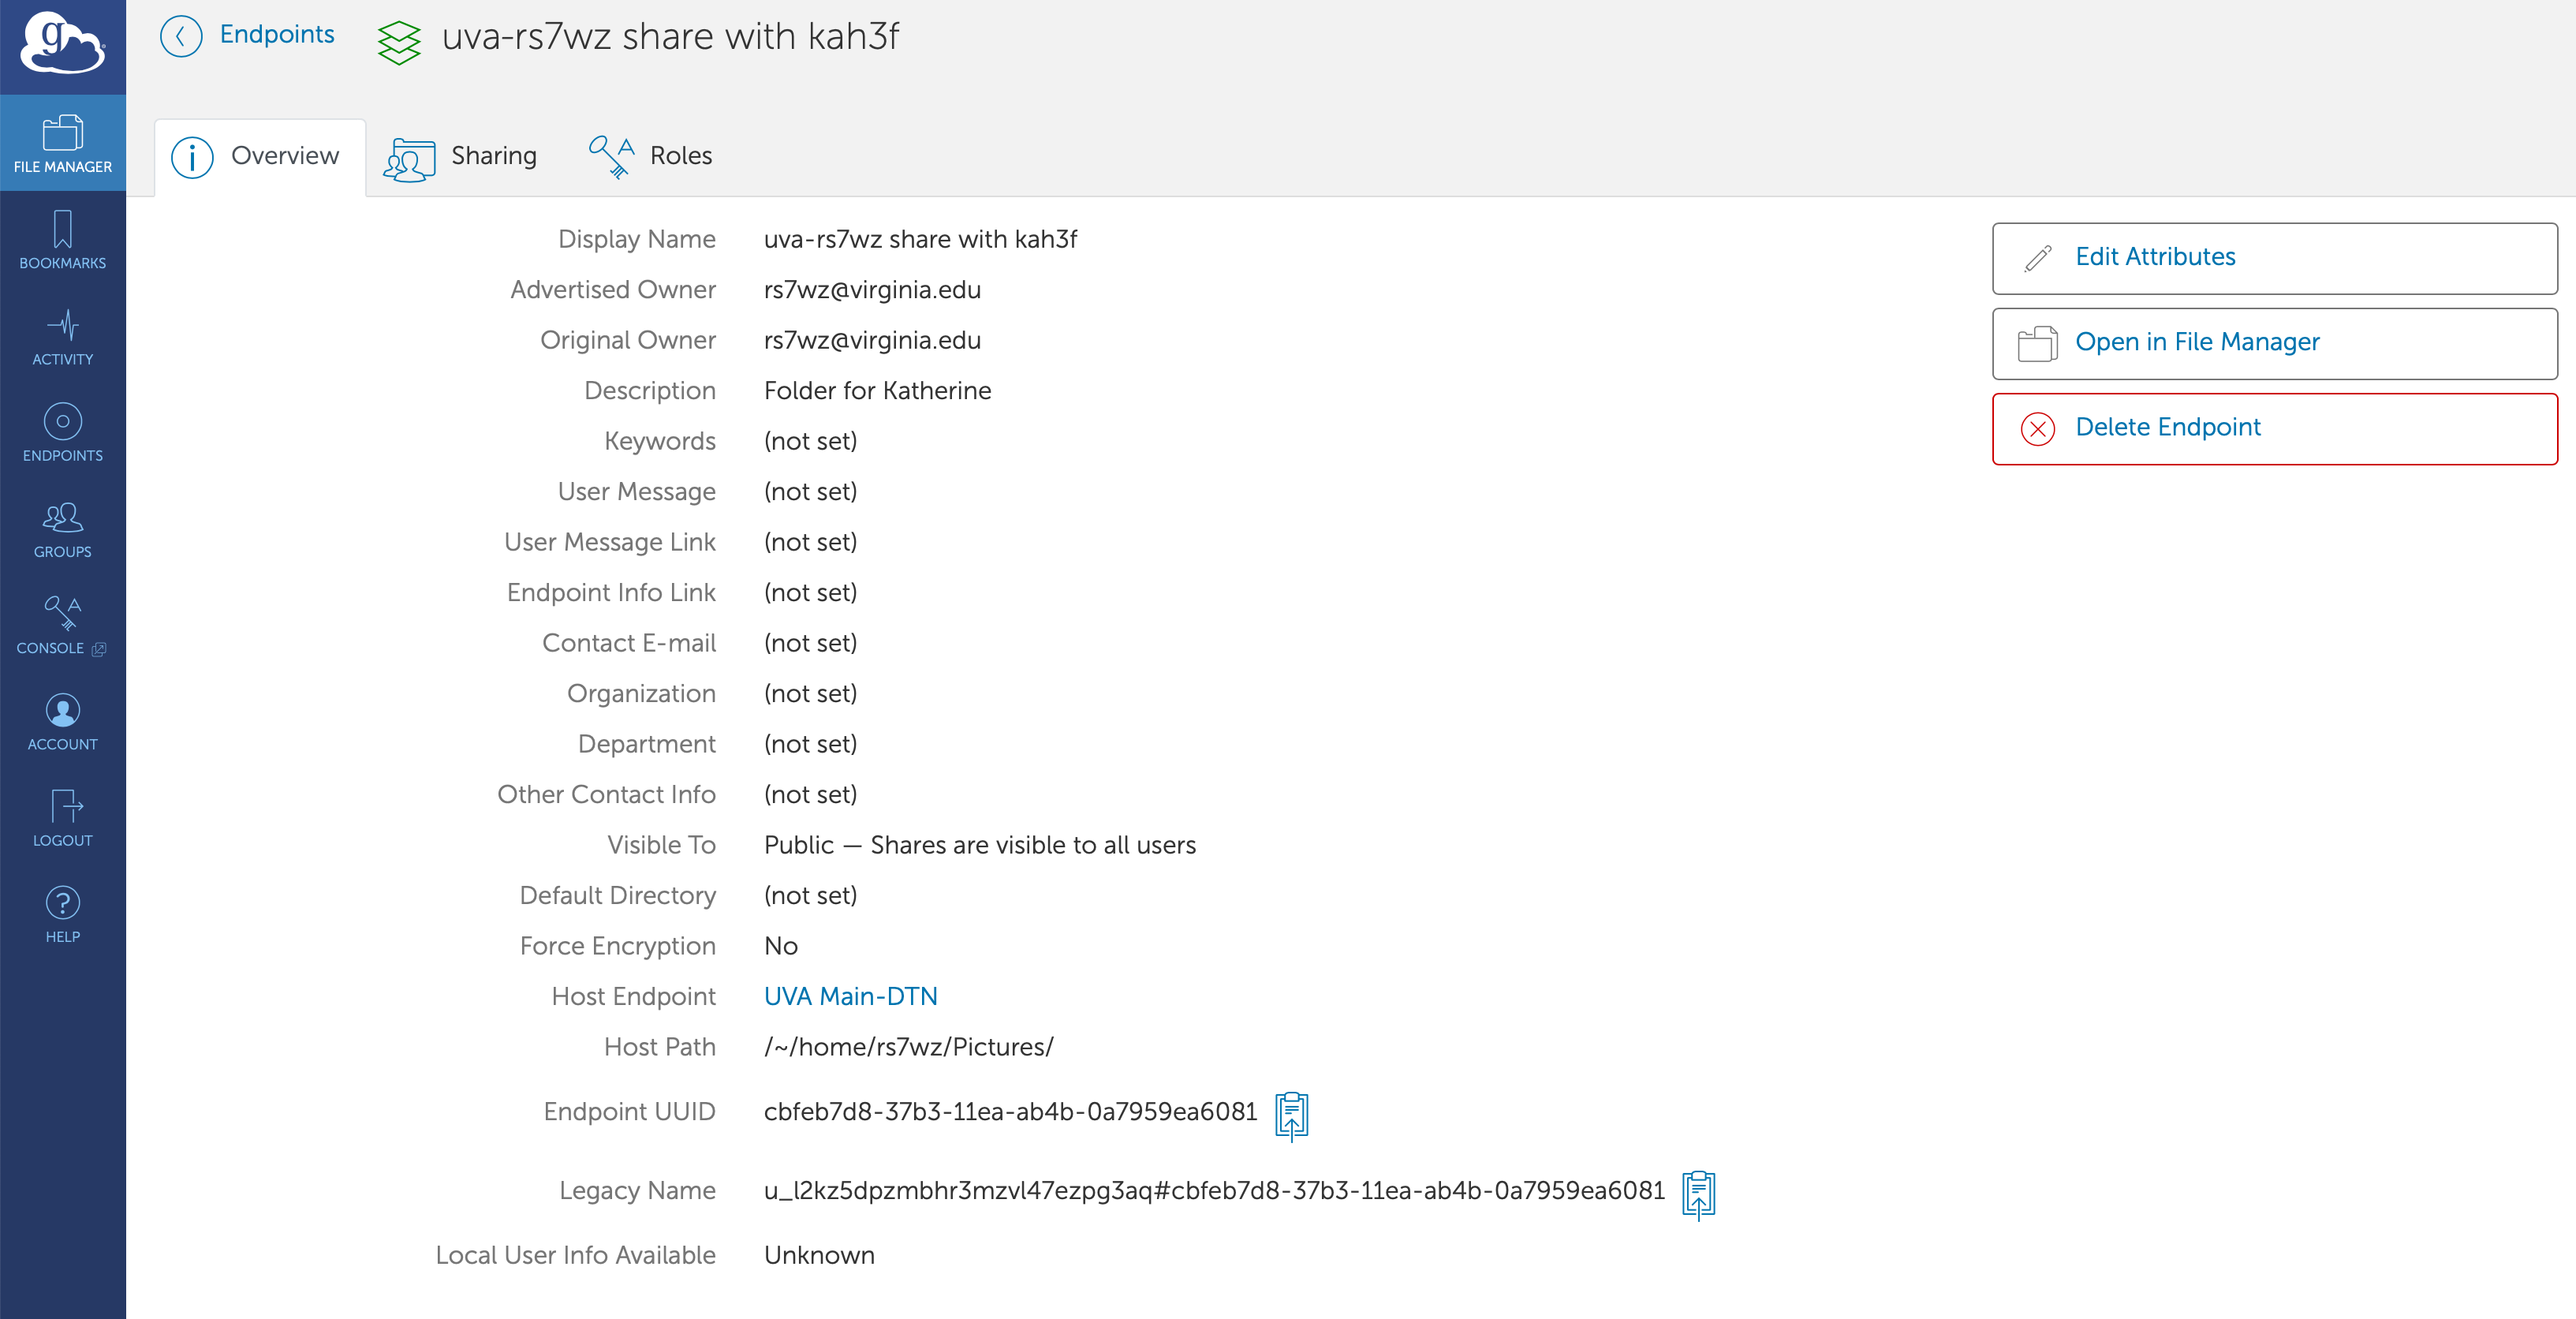
- Since a share is a Globus collection, to manage it see the Managing Endpoints section below. You may delete the share to remove access, once your recipient has obtained the folder.
Managing Endpoints
The Globus interface makes it easy to manage and delete your endpoints.
You can view your collections, including your shared collections or other collections that have been shared with you, by clicking on the Endpoints submenu at the File Manager page.
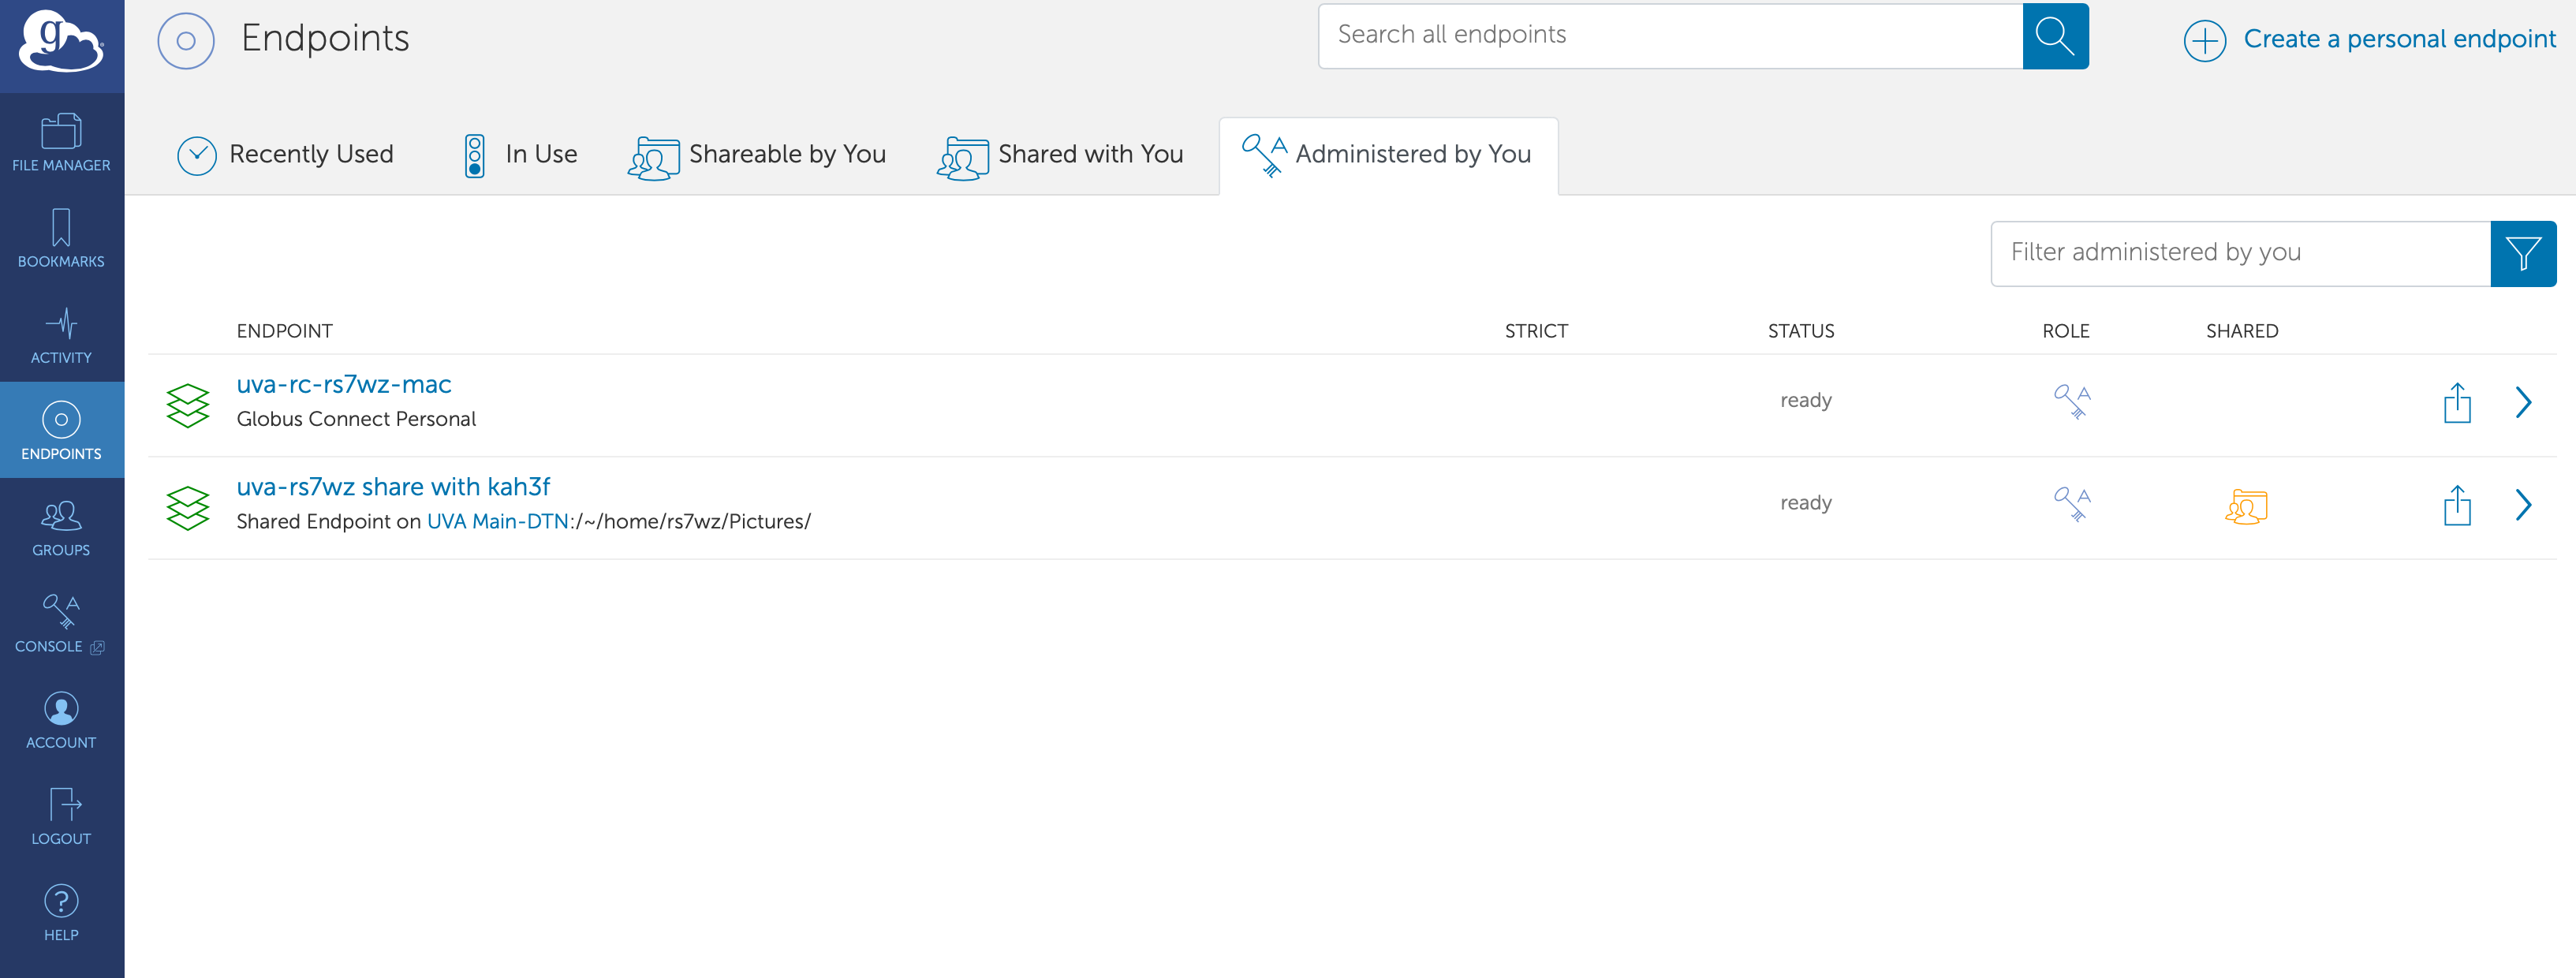
From this page you can see endpoints
- That are shared with you
- That are shareable by you
- That are administered by you
Clicking on the name of each collection will allow you to review or modify settings. You can modify only collections that are administered by you. To modify or delete a collection, click the Administered By You tab, then click the endpoint you wish to manage. You can edit its properties, open it, or delete it.
Security
UVA permits faculty and researchers to manage data transfer and sharing with colleagues and collaborators themselves. However, with this ability comes the responsibility to share wisely and carefully. Therefore, we ask that you follow a few basic principles when you share data using Globus:
- Grant the least permissions necessary, not the most. If a colleague needs only to retrieve your data files, then grant read-only permissions.
- Grant access to specific individuals only, not to “all users” or to the public. These settings risk your information going to people and places that you have not designated, or being used in ways you do not control.
- Remove shared collections as soon as they are no longer needed. It is a good practice to revisit your endpoints page periodically to clean up and to cull unused resources.
- Finally, monitor and track your large file transfers. When someone is transferring large data sets to you, or you to them, monitor their progress and keep in touch with the person or group on the other end. This helps identify any unusual behavior.
For Advanced Users