
The UVA secure environment consists of Ivy virtual machines (Linux and Windows) and Rio HPC. Researchers can use Ivy and Rio to process and store sensitive data with the confidence that the environment is secure and meets requirements for HIPAA, FERPA, and certain controlled-access data (e.g. dbGaP, NIMH NDA, etc.). However, projects involving CUI or ITAR data cannot access Rio at this time. To access the High security Rio HPC, researchers need to request an Ivy Linux VM which serves as a login node.
Facilities Statement - Are you submitting a grant proposal and need standard information about UVA research computing environments?
Get it here.
Overview
Ivy provides virtual computing environments (virtual machines) specifically designed for interactive and small-scale analysis of highly sensitive data. Ivy Linux VMs can also act as a frontend for accessing the Rio HPC environment, which is optimized for large-scale analysis of sensitive data. Project-specific storage volumes are seamlessly mounted to the VMs and made accessible on the HPC system, facilitating smooth transitions between tasks performed on the VM and the HPC environment. In order to obtain access to either system, users must
- Submit an account request,
- Complete the Information Security Awareness Training, and
- Ensure their personal computer meets all High Security VPN requirements.
Requesting Access
Access to Ivy resources is project-based, limited to PIs and their designees, and requires approval. Once a project is approved a PI and her/his researchers must sign a RUDA (one for every researcher on each project).
Security Training
In order to use Ivy, researchers must complete the High Security Awareness Training (HSAT). This training takes approximately 10 minutes to complete.
Please complete the training at the following link: https://in.virginia.edu/hsat-training.
High Security VPN
The High Security VPN (HSVPN) allows researchers to connect to Ivy securely both on and off grounds. In order to use the HSVPN, users must ensure that their personal machines meet the following requirements. More information on HSVPN compliance can be found on the ITS website: https://in.virginia.edu/vpncheck
-
Install the Cisco AnyConnect Secure Mobility Client.
This can be found at the UVA ITS Software Gateway. Be sure to install the version of VPN Client HS 4.6 that is compatible with your personal computer’s operating system. More detailed instructions for installing the VPN client can be found on the ITS website.
-
Install Opswat.
Opswat checks if your computer is compliant with HSVPN requirements. Opswat can be downloaded from the UVA ITS Software Gateway.
If your personal machine’s operating system is no longer supported and does not allow for disk encryption, having OPSWAT installed will not resolve the issue. The recommended solution is to upgrade the operating system or acquire a device with an updated OS that meets these security requirements.
- Install Anti-malware software (Windows Defender recommended).
Anti-malware software must be installed on your machine. Windows Defender is behavioral-based antimalware software and meets UVA’s HSVPN requirements. Windows Defender can be downloaded from the UVA ITS Software Gateway.
Connecting and Signing In
1 Authentication
You will sign in to all Ivy resources using your UVA computing ID and Eservices password. Because of Ivy's high security requirements, your Eservices password must be changed every 60 days.
Need help resetting your Eservices password?
If you are working from a secure Health Systems workstation you are ready to connect. If you are working from elsewhere on or off Grounds you will need Duo MFA and a High Security VPN connection.
2 Duo MFA

To connect to the Ivy environment with VPN you will need to install the Duo Mobile multi-factor authentication (MFA) app on your smartphone.
In the context of Ivy, Duo allows you two ways to provide a second factor of authentication beyond your password: via a random 6-digit key, or via a push message direct to your phone.
3 High Security VPN
With your UVA computing ID, Eservices password, and Duo Mobile in hand, you must run the Cisco AnyConnect software to start a UVA High Security VPN connection every time you use any Ivy resource. AnyConnect will authenticate to the UVA network using a digital certificate installed on your workstation.
More information on VPN from ITS:
Once you have completed these three steps, you will be connected to the secure Ivy network. From there you can connect to a Virtual Machine, or use a web browser to access JupyterLab.
Storage
Ivy VM and Rio HPC have a pool of over 2 petabytes of Network Attached Storage shared amongst users. A PI specifies the storage space s/he would like to have when requesting access to either of these environments. Virtual machines do not come with any significant disk storage of their own.
Virtual Machines
A virtual machine (VM) is a computing instance dedicated to your project. Multiple users can sign in to a single VM.
Virtual machines come in two platforms, Rocky 8 Linux and Windows Server 2019. Each platform is available in numerous instance types. Refer to the grid below for specifics.
| Type |
Specs |
Cost |
| Small |
4 cores / 16GB mem |
$12/month |
| Medium |
8 cores / 32GB mem |
$48/month |
| Large |
16 cores / 64GB mem |
$96/month |
| Xlarge |
16 cores / 124GB mem |
$176/month |
Once created, your instance will be assigned a private IP address that you will use to connect to it (in the format 10.xx.xx.xx). VMs exist in a private, secure network and cannot
reach outside resources on the Internet. Most inbound and outbound data transfer is managed through the Data Transfer Node (see below).
Connecting to your VM
Before connecting to your VM, you must run the High Security VPN. Make sure that you have the VPN client installed on your laptop/desktop.
Next, you will need to know two pieces of information:
- The type of VM that you have, either Windows or Linux;
- The IP address of your VM (e.g., 10.xxx.xxx.xxx).
The steps for connecting to the VM will depend on the type of VM and, to a lesser extent, the operating system of your laptop/desktop (i.e., MacOS or Windows).
To connect to a Windows VM from a Mac, you will need the Microsoft Remote Destop application which you can download here .
Windows laptops/desktops already have the Remote Desktop Connection application installed.
STEPS TO CONNECT TO YOUR VM
Follow the steps below for the type of VM that you have:
- Start the High Security VPN
- Run the Remote Desktop application (see comment above for installing this application on Macs)
- Enter the IP address for your VM
- Sign in with your Eservices password and your computing ID prefixed by ESERVICES as the username (i.e.
ESERVICES\mst3k)
- Start the High Security VPN
- Open a web browser and enter the IP address for your VM (e.g., https://10.xxx.xxx.xxx)
- If you get a warning message, you may need to click on Advanced Settings and/or a Connent Anyway option, depending on your web browser
- Use your Netbadge credentials to log in
In addition to connecting to a Linux VM through a web browser, you have the option of connecting with an ssh client. To do this, follow these steps:
- Start the High Security VPN
- Open the ssh client on your laptop/desktop (Terminal application on a Mac or Command Prompt on a Windows PC) and type:
ssh mst3k@10.xxx.xxx.xxx, where mst3k is replaced with your user ID.
- When prompted for a password, use your Eservices password.
Software
Every virtual machine (Linux or Windows) comes with a base installation of software by default. These help researchers by providing the basic tools for data processing and manipulation. Additional software packages are pre-approved and available for installation upon request. See the lists below for options.
Preinstalled Software
Click on each for details:
Click on each for details:
Python/R Packages - Anaconda Python and R packages are available to users through the normal pip, conda, and CRAN and library installation methods.
ADDITIONAL APPROVED SOFTWARE (Available by Request)
If you require additional software not listed, you must submit a request. Requests are reviewed by the UVA ISPRO office for security and regulatory compliance and, if approved, will be installed for you.
Click on each for more information:
Click on each for more information:
To request installation of optional software packages, please use the web request form provided through this link:
Installing Python Packages on Your VM
CREATING CONDA ENVIRONEMENT
Researchers often require Python packages that are not included in the base installation of Anaconda. Users can install additional Python packages on their VMs using conda environments. Conda environments allows users to install packages in isolated environments to avoid version conflicts with other users on the VM.
Windows
-
Launch “Anaconda Prompt” from the Start Menu.
-
From the prompt, issue the command:
conda create -n my_env package1 package2
where my_env is the name you wish to give your new conda environment, and package1 and package2 are the names of the Python packages you want to install.
-
To activate and use your new environment, issue the command:
conda activate my_env
Linux
-
Log into your VM via SSH or log in through your web browser and launch the Terminal.
-
From the prompt, issue the command:
conda create -n my_env package1 package2
where my_env is the name you wish to give your new conda environment, and package1 and package2 are the names of the Python packages you want to install.
-
To activate and use your new environment, issue the command:
conda activate my_env
Creating a Conda Environment with a Specific Python Version
If you require a specific version of Python, you can create a new conda environment with:
conda create -n my_env python=2.7
INSTALLING PACKAGES
After creating your conda environment, you can install additional libraries with pip and conda.
Installing Packages with pip
-
Use pip from the command line to install individual packages:
pip install numpy
-
You can search for a package:
pip search panda
-
To see which packages you have installed already:
pip list
-
You can install packages listed in a requirements.txt file (one package per line):
pip -r requirements.txt
-
To save a list of your currently installed packages in a requirements.txt file:
pip freeze > requirements.txt
Installing packages with conda
conda works similarly to pip.
Once installed on your VM, packages will persist and you will not need to install them again. You will only need to import them again in your code.
Scheduled Maintenance
Beginning Sunday, April 14, your Ivy virtual machine (VM) will be rebooted on the 2nd Sunday of each month between 5:00 a.m. and 6:00 a.m. EST while RC engineers install security updates. Any sessions running during this period will be terminated. Windows and Linux VMs will be rebooted at the same time.
If you have any questions or problems with your software applications after the security updates have been installed, you may contact our user services team.
JupyterLab Notebooks

JupyterLab is a web-based interactive development environment for Jupyter notebooks, code, and data. JupyterLab is flexible: configure and arrange the user interface to support a wide range of workflows in data science, scientific computing, and machine learning. JupyterLab is extensible and modular: write plugins that add new components and integrate with existing ones.
Using the Rio HPC System
Access
Access to the Rio HPC requires an Ivy Linux VM to serve as a login node. Similar to other Ivy VMs, access to the Rio HPC is project-based. For details on requesting an Ivy Linux VM and accessing it, please refer to the instructions provided above. Please note that PIs must specifically request for their associated Linux VM to be provisioned as a frontend to Rio. Access to Rio from the VM is not granted by default.
As outlined above, VMs are available in various sizes. Please request a VM that is appropriately sized for your specific workflow. For larger groups or projects involving computationally intensive tasks, we recommend selecting a larger VM, with a preference for Small or above.
Please note that PIs must specifically request for their associated Linux VM to be provisioned as a frontend to Rio. Access to Rio from the VM is not granted by default. After submitting the Linux VM request, PIs should also submit a general support request through our webform specifying that the VM requires access to Rio. The title of the project should be included in the details of the request.
System Details
HARDWARE CONFIGURATION
Currently, Rio comprises 39 compute nodes, providing a total of 1,560 x86 64-bit compute cores. Each HPC node is equipped with 375 GB of RAM to accommodate memory-intensive applications. Rio also includes an NVIDIA HGX H200 GPU, and additional GPU nodes designed to support AI and machine learning workloads will be integrated in the near future.
JOB QUEUES
Similar to our clusters Rivanna and Afton in standard security zone, Rio is a managed resource. Users must submit jobs to queues controlled by a resource manager, also known as a queueing system. The manager in use on Rio is Slurm. Slurm refers to queues as partitions because they divide the machine into sets of resources. There is no default partition and each job must request a specific partition. Partitions and access policies are subject to change, but the following table shows the current structure. Detailed information on Slurm and instructions for submitting jobs to the HPC can be found here.
| Partition |
Purpose |
Max Time / Job |
Max Nodes / Job |
Max Cores / Job |
Max Cores / Node |
Default Mem / Core |
Max Mem / Node / Job |
| standard |
CPU-based jobs |
7 days |
10 |
400 |
40 |
4 GB |
375 GB |
| gpu |
GPU jobs (H200 general purpose) |
3 days |
1 |
1GPU |
96 |
4 GB |
2 TB |
For an introduction to the Rio HPC system, please see our tutorial.
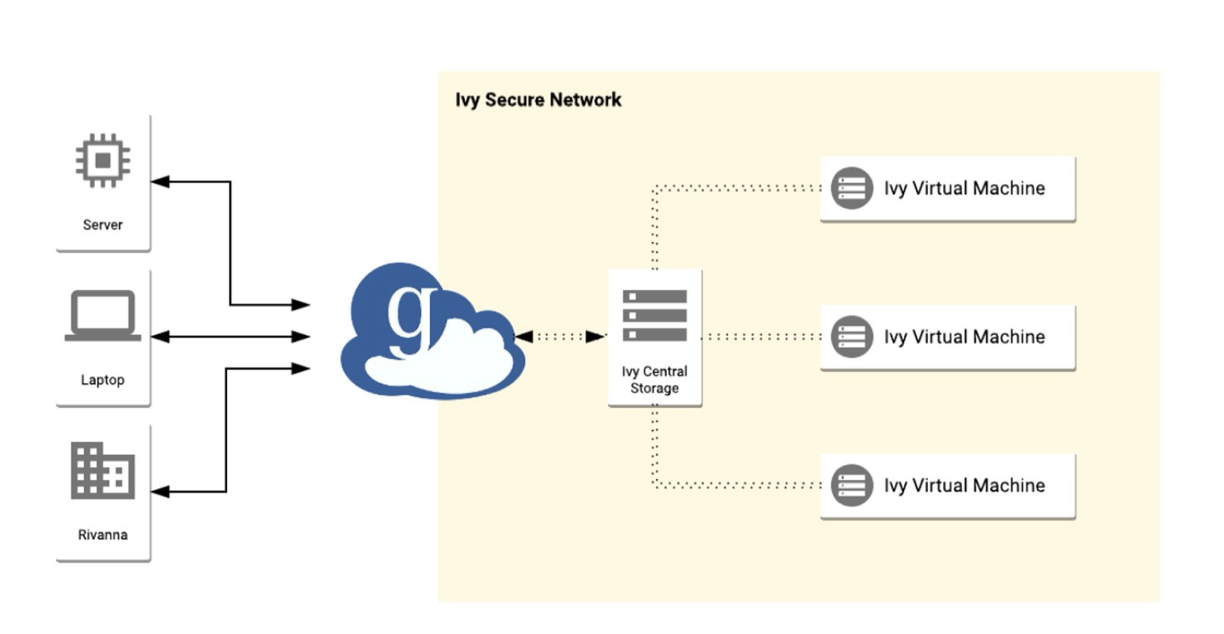
Data Transfer In/Out of Ivy/Rio
Moving sensitive data into the Ivy VM platform (and Rio) is possible through a secure Globus DTN (data transfer node). The Ivy DTN is connected to a pool of secure storage called “High-Security Research Standard Storage”, which in turn is connected to Ivy VMs. Only active research projects using Ivy virtual machines can use this service.
How to Connect to the DTN and Transfer Files
Before transferring files to Ivy, you will need Globus installed on the computer you are transferring data from. Globus can be downloaded from https://www.globus.org/globus-connect-personal.
-
Ensure that you are NOT connected to the HSVPN. Data transfer will not work if you are connected to the HSVPN.
-
Open Globus in your web browser: https://app.globus.org/file-manager. When logging in, select University of Virginia and log in with Netbadge.
-
Once you are in the Globus File Manager, select the two-panel view by clicking the two-panel button beside the Panels button in the top-right corner of the page. This should open a second panel on the page, so that you have two side by side.
-
In one panel, click on the Collections field and select your computer. You can then click to the directory that contains the data you want to move, or type the path to the directory in the Path field. Click the files or folders you want to transfer to select them.
-
In the remaining panel, click on the Collections field and search for and select the UVA IVY-DTN. Select the storage share to which you want to transfer data. (Unless you are part of multiple Ivy projects, you should only see one storage folder.)
-
Click the Start button beneath the first panel (should be highlighted) to begin the data transfer.
-
Once the data transfer is complete, you will be able to access the data in your VM by clicking the High-Security Research Standard Storage shortcut on your VM’s desktop.